Seven months. Almost four seasons. A whole lot of trips to buy things I was absolutely certain I had already bought enough of.
The Camphouse Shed is finally finished, and I couldn’t be happier with it. What started as a patch of dirt and weeds is now a place for the family to hang out around a fire, play some music, and enjoy college football. It also stores tools, which is helpful because, technically, that was the assignment.
This is still a utility shed, not a finished tiny house. But between the cedar porch, hidden TV, outdoor speakers, and refrigerator, I understand how the distinction got a little blurry.

Getting here meant finishing the metal roof, tackling a mountain of paint preparation, moving an unreasonable amount of rock, and finally doing something about the construction disaster inside. The final project cost came to $17,250. Here’s what went into the finish line and how the whole space works.
Key Takeaways
- The finished Camphouse Shed combines utility storage with a porch, outdoor entertainment, and a fire pit gathering area.
- Careful paint preparation and protected cedar accents brought the dark exterior together.
- Grading and river rock addressed exposed soil, erosion concerns, and mud splashing onto the siding.
- The project totaled $17,250, including $2,580 for the final finishing phase.
Table of Contents
- Finishing the Metal Roof, Finally
- The Paint Job Was Mostly Everything Before the Paint Job
- Ground Cover: More Rock Than I Thought Possible
- Turning Construction Chaos Into a Useful Shed Interior
- The Features That Make It a Backyard Hangout
- What the Camphouse Shed Actually Cost
- What I Would Take Into the Next Big Build
Finishing the Metal Roof, Finally
The roof was one of those jobs that should have been finished months earlier. At this point, the remaining work was securing the back panels and installing the ridge caps. Simple enough on paper. Less simple on a steep metal roof.
I secured the bottoms of the back panels with closures and screws, then worked through the remaining fasteners up each panel. Naturally, I measured the screw locations so everything lined up neatly, even though essentially no one would ever see that side of the roof.
I would see it. Apparently, that was enough.
Access was the real challenge. My homemade 2x4 roof ladder helped me reach the work, but it was clunky and, at times, pretty sketchy. That is not a feature worth copying. Anyone planning similar work should sort out proper access and fall protection first; OSHA’s fall-prevention resources are a useful starting point.
For the ridge caps, my installation sequence was:
- Install closure strips on both sides of the ridge.
- Apply silicone over the closures.
- Position the metal ridge cap.
- Secure it with screws.
The raised middle section complicated things slightly because the roof needed ridge caps for two different pitches. I finished that section last using the same basic process. With those caps installed, construction was finally complete.
The Paint Job Was Mostly Everything Before the Paint Job
Before starting the finishes, I cleared away months of construction debris. I had kept most of the waste in one general pile, which made the final cleanup relatively quick. Once the scraps and temporary work surfaces were gone, the whole area looked better and somehow felt bigger.
Then came painting: one of the most rewarding parts of a build, attached to one of the longest preparation lists.
Caulking, Cleaning, and Masking
First, I caulked the siding and trim. It seals the intended joints, cleans up the transitions, and hides those little mistakes that we may or may not have made along the way. I also applied clear silicone around the inside edges of the windows.
The siding needed cleaning, too. Rainwater coming off the roof was hitting bare ground and splashing mud onto the lower walls. Runoff had already started eroding the soil in front of the porch, so that was clearly something I would need to address beyond simply washing it off.
A small battery-powered pressure washer removed the construction dirt and mud in about 15 minutes. After allowing everything to dry, I masked the metal roof, windows, and cedar accents.
Spraying saves time during application, not during masking. There is no getting around the preparation if you want the paint to stay where it belongs.
Peppercorn Siding, Black Trim, and Cedar Accents
The main exterior color is Peppercorn, SW 7674, in satin. I originally bought one gallon, which is hilarious in hindsight. After another trip to the paint store, I had five more gallons available to finish the job. That was six gallons purchased, not six gallons used, and I still had quite a bit left afterward.
I used the same Graco Pro X17 sprayer I had used on my shop. With the basics of spraying under control, it made getting a consistent finish much easier. In roughly 40 minutes, most of the shed was covered, and a decent chunk of that time was spent moving the ladder and untangling the hose.
For contrast, I used Satin Black, PPU26-01 on the trim. The goal was a dark exterior with warm cedar accents, rather than bright trim outlining every feature.
The window trim needed a couple of coats by hand. I also brushed the raised dormer section instead of setting up to spray it. That decision came with a little regret: the shake-style siding had plenty of texture and small pockets that required tedious dabbing with a brush.
That is where a sprayer really earns its keep. Flat surfaces are easy enough either way, but textured siding gives a brush a lot more work to do.
Protecting the Cedar
Cedar is a good fit for outdoor projects because of its natural resistance to decay and insects, but I also wanted to help preserve its appearance. Left exposed, it tends to fade toward gray.
I applied a clear outdoor wood finish to all the cedar, including the porch posts and beam, the porch soffit, and the gable-end soffits. The finish darkened the wood slightly, which made the grain and warm color stand out against the gray siding.
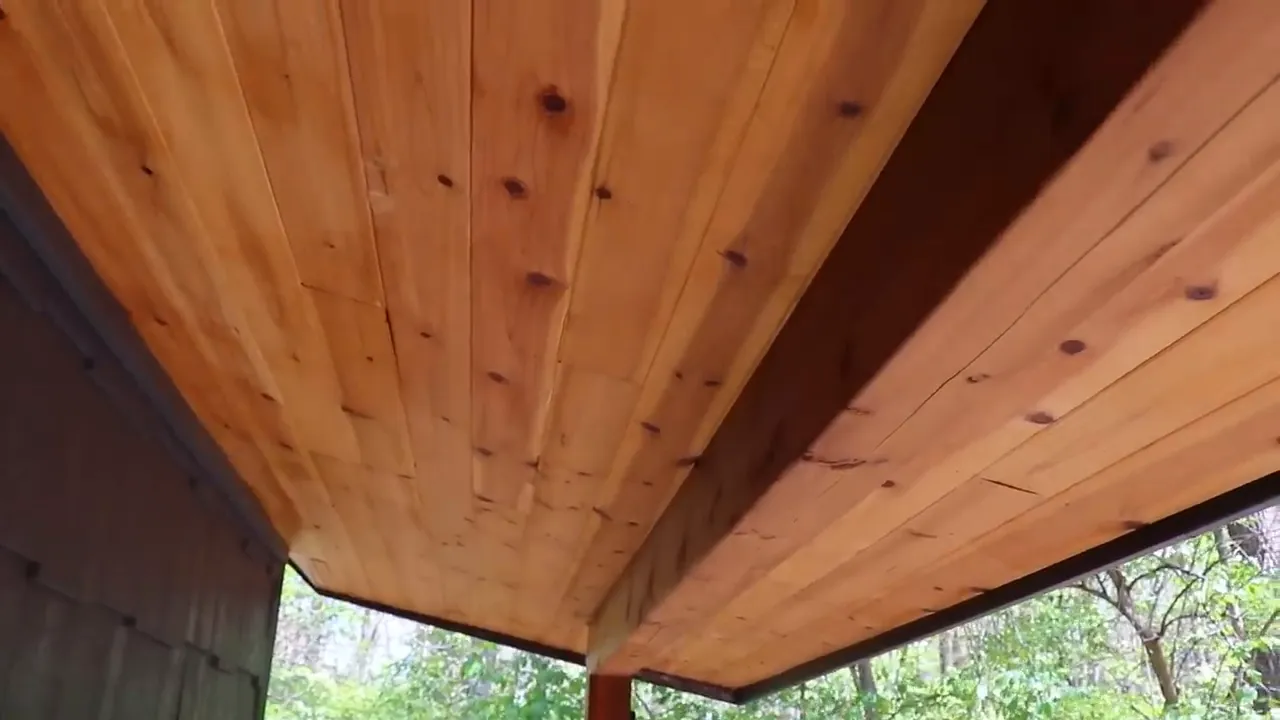
This is not a finish-and-forget situation. I expect to reapply it every couple of years as needed. That is part of the deal when keeping natural wood looking the way you want outdoors.
Ground Cover: More Rock Than I Thought Possible
The landscaping was the part I had been looking forward to least. I did not want a mud pit around the shed, and I definitely did not want the fire pit area disappearing back into weeds.
Before covering anything, I graded around the building, particularly along the back, to help manage runoff and reduce erosion around the foundation. I also repaired the washed-out area in front of the porch.
Next came weed barrier around the fire pit, secured with stakes. The fabric and ground cover were intended to help keep the area clear without leaving exposed dirt everywhere.
Why River Rock Won Over Mulch
Originally, I considered chunky mulch or bark, similar to what you might find at a playground. It would have looked nice and felt comfortable underfoot.
Then I thought about fall.
This spot sits among trees, which means a lot of leaves. Trying to blow leaves out of lightweight bark without relocating the bark along with them sounded like a problem I did not need. River rock made more sense for that kind of maintenance.
I bought bagged rock instead of bulk material. Bulk would have saved some money, but bags were easier to load into my cart, haul down to the shed, and empty exactly where needed. Delivery was also tidier than having a loose pile dumped in the driveway.
Shoveling rock ranks right alongside digging ditches on my list of favorite activities. I was happy to pay a small premium to do less of it.
Three Rounds of Buying Rock
The first 6,000 pounds of rock and gravel did not come close to finishing the area. So I bought another 5,000 pounds.
That still was not enough.
I eventually went back for another 50 bags to complete the perimeter. Being off by a factor of three feels pretty on-brand for a DIY project, but it is not an estimating method I recommend.
At a known drainage spot near the porch, I added pea gravel before covering it with river rock, with the intention of giving water an easier route out. The finished rock area connects the porch to the fire pit and continues around the shed.
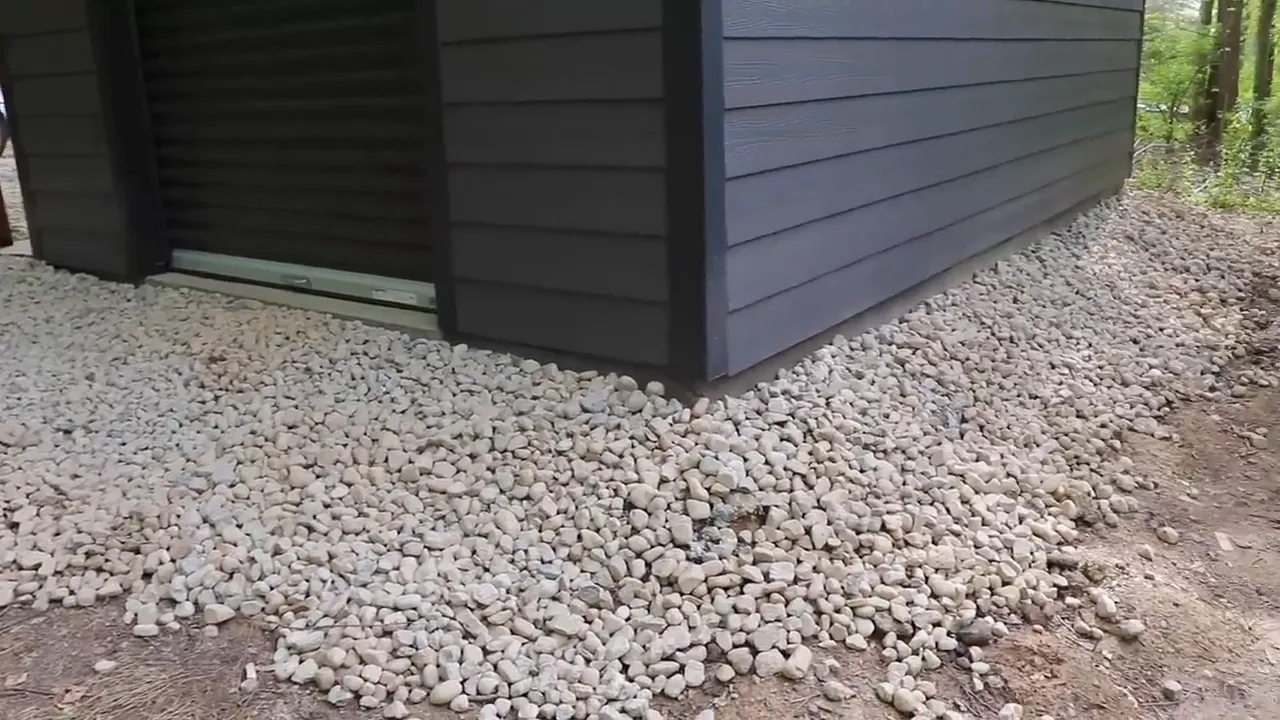
The important distinction is that the grading came first. The rock covers and protects the ground surface; it does not replace the need to think about where water is going.
Turning Construction Chaos Into a Useful Shed Interior
For seven months, my end-of-day cleanup strategy had largely been to shove everything inside and close the door. You can probably guess how that worked out.
Unlike consolidating the outdoor trash, the lack of organization inside absolutely cost me time. I spent too much of the build looking for tools and supplies. A little shop organization would have gone a long way, and yes, the irony is fully appreciated.
Once everything was cleared out, I built a workbench across the entire 12-foot back wall. That built-in was also the reason the entry door was not positioned closer to the corner: I had planned for the door to clear the bench.
A Full-Width Workbench With Reused Materials
The bench has a wall-supported frame and front legs fitted with adjustable cabinet feet. Those feet let me compensate for unevenness in the slab while keeping the wooden leg ends off the concrete.
I spaced the supports around a very important piece of shed equipment: the refrigerator.
For the work surface, I reused deck boards removed from our covered patio. They were still in good shape and perfectly suitable for a utility workbench. Above that, I installed leftover Crownwall panels from my garage project. I had just enough to fill the center section.
A long shelf above the bench holds storage totes. Between the shelf, work surface, and hanging storage, that one wall now does a lot without taking over the room.
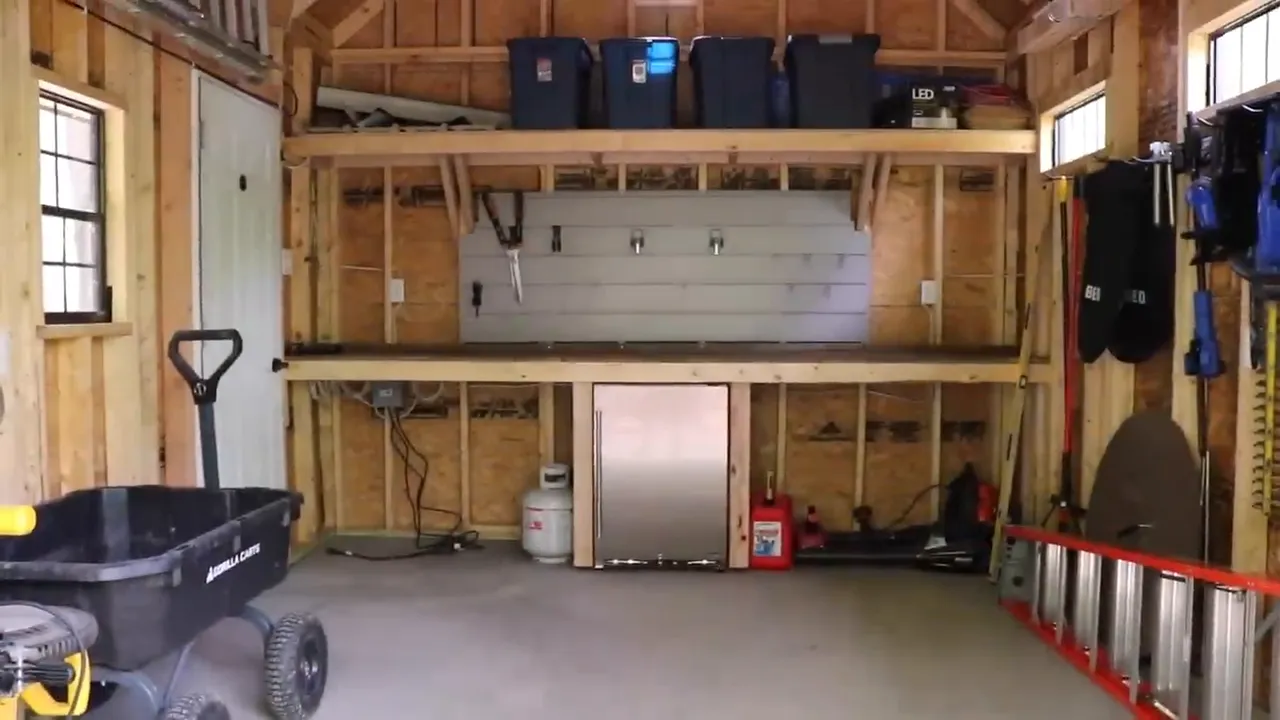
I can add shelving along the other walls or above the overhead door later. For now, I would rather build storage as I need it than fill every available surface just because I can.
Lighting, Outlets, and Temporary Power
The lighting is split into two independently switched groups: Barrina fixtures overhead and smaller fixtures under the shelf to light the workbench. I installed five outlets around the walls, since the main expected loads are the refrigerator and TV rather than a shop full of machines.
At the time of completion, the shed did not have a permanent electrical feed. I brought the circuits to a junction box and used cord connections to a Zendure SuperBase Pro 2000 power station as an interim power source.
It can support the LED lights, small refrigerator, and TV, although I did not establish a specific runtime for that combination. A permanent electrical supply remains a future project. This temporary arrangement is a description of my setup, not a wiring guide; permanent shed wiring and any temporary supply should be evaluated for the applicable electrical requirements.
Keeping the Floor Open
Wall racks hold yard tools, brackets store leftover construction lumber, and the extension ladder is mounted up out of the way.
The high ceiling was intentional. It leaves room for overhead storage or potentially a loft later, rather than locking the space into one arrangement now.
The concrete foundation had also made it through several freezes and plenty of rain without visible cracking at that point. That was encouraging, but I am not calling one period of good performance a lifetime guarantee.
The Features That Make It a Backyard Hangout
The shed still handles storage, but the outdoor features are what turn this corner of the yard into somewhere we actually want to spend time.
A Hidden TV and Outdoor Audio
The TV sits inside the shed behind a porch-facing window. From outside, it becomes an entertainment screen without an exposed television permanently attached to the siding.
Two outdoor speakers mounted beneath the porch eave connect to a small amplifier and Bluetooth receiver. Normally, that setup carries the TV audio. Switch to Bluetooth, and it handles music instead.
That gives us football audio or music around the fire pit using the same speakers, without much equipment cluttering the porch.
A Covered Firewood Rack
The little roof overhang on the end of the shed finally has an obvious purpose: it covers the firewood.
I built a simple platform beneath it using the same style of masonry blocks as the fire pit, then assembled the rack from cedar 2x4s and metal firewood-rack brackets. The brackets make it easy to size the rack for the available space.
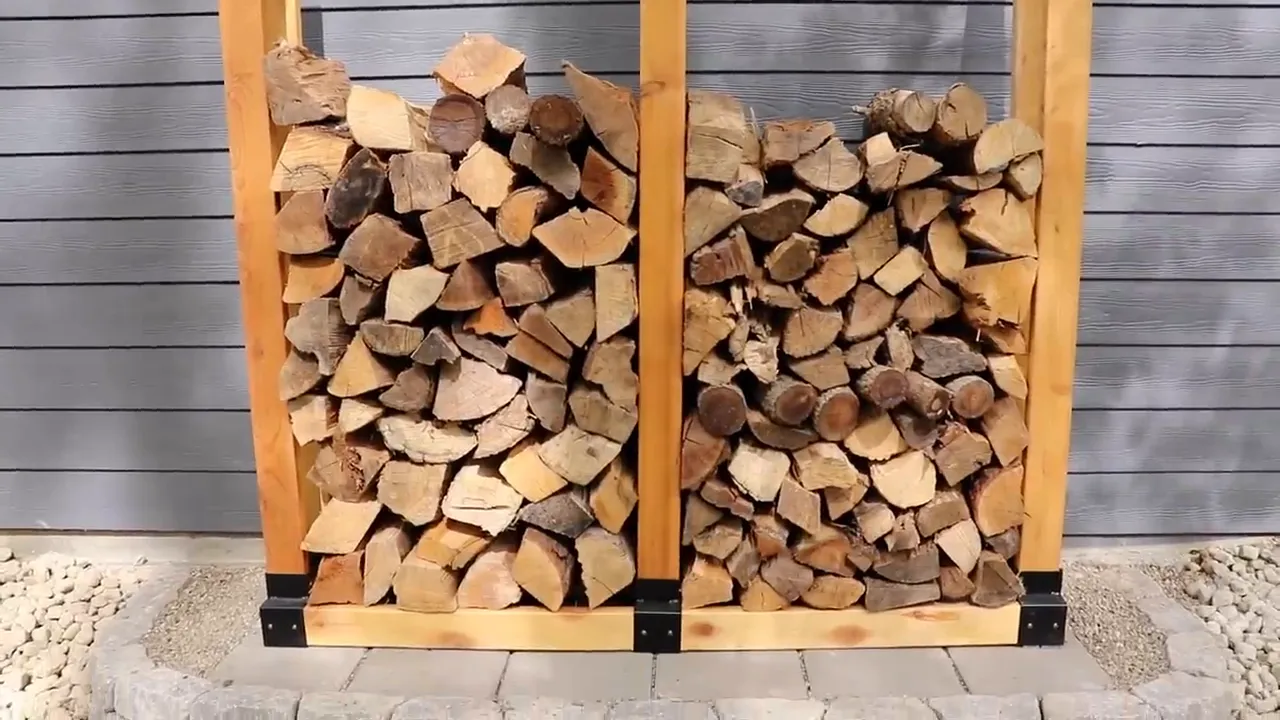
Now the wood is sheltered, close to the fire pit, and organized instead of sitting in a random pile.
A Refrigerator and a Place to Sit
The refrigerator under the workbench is an outdoor-rated NewAir unit. Since this is a shed environment rather than a conditioned kitchen, that rating was an important part of the choice.
Around the fire pit, gray plastic Adirondack chairs match the shed and work fine for now. I suspect a future upgrade may involve building something. Apparently, finishing one project does not prevent the next one from forming.
The overall result is what I had hoped for: tool storage inside, a covered porch outside, and a clean gathering area where the family can enjoy a fire without standing in mud.
What the Camphouse Shed Actually Cost
Before the final finishing phase, the running project total was $14,670. That included $655 from the preceding construction stage, mainly for cedar, trim, siding, and the remaining roof odds and ends.
The final phase added:
- Hardscape and rocks: $1,114. Mostly bagged river rock, plus two delivery fees courtesy of my optimistic estimating.
- Painting supplies: $600. Caulk, masking materials, and six gallons of high-quality exterior paint, with paint left over.
- Entertainment: $379. Outdoor speakers, the Bluetooth amplifier, and miscellaneous speaker wiring.
- Interior supplies: $339. Lumber, electrical materials, and related interior work.
- Miscellaneous: $148. The remaining odds and ends.
The finishing phase totaled $2,580, bringing the project grand total to $17,250.
Yes, that is a lot of money for a shed. It is also worth putting the number in context.
At the time, I configured a Tuff Shed through Home Depot with similar features, and the quoted total was $14,273 without a foundation. A neighbor also had a high-quality Amish-built 10-by-16-foot shed, slightly smaller than mine, installed on a gravel base for about $14,000.
Those are reference points, not perfectly identical comparisons or current quotes. Still, they helped put this admittedly over-the-top project in perspective. The total was not wildly outside the ballpark of other sheds with comparable size and features.
What I Would Take Into the Next Big Build
From start to finish, this project spanned seven months, including roughly two winter months when very little happened. Call it about five active months of turning an overgrown patch of yard into a genuinely useful space.
I would estimate the landscaping materials more carefully next time. I would stay more organized during construction. And I would give textured siding the respect it deserves before deciding to paint it all with a brush.
But I would absolutely take on the challenge again.
The original build finished before I had put together a set of plans. Those Camphouse Shed plans are now available for anyone interested in the design.
More than anything, this project reinforced how much you learn by building something outside your comfort zone. There were things I could not have understood nearly as well without doing them myself, working through the awkward parts, and getting the struggle bus across the finish line.
You do not need confidence that you already know how to do every step. You need confidence in your ability to figure out the next one.
That is how a dirt patch becomes a shed. Or, apparently, something suspiciously close to a tiny house.


