I thought our backyard transformation would take a year. I thought I could handle a big chunk of it myself. And I thought our budget was reasonably accurate.
I was wrong on all three counts. Very, very wrong.
What started as a detached workshop became a pool, spa, outdoor kitchen, giant boulder retaining walls, new driveway section, landscaping, a 600-square-foot deck, and a covered porch renovation. For roughly two years, our backyard was a construction site with a generous helping of mud.
The finished space is exactly what my wife and I wanted: somewhere to cook, entertain, spend time with the kids, and finally sit down. But getting there taught me that a dream backyard depends just as much on buried pipes, equipment access, and the right people as it does on the pretty stuff.
Key Takeaways
- Design the whole backyard before construction to reduce expensive changes after infrastructure is installed.
- Plan drainage, conduit, and equipment access before finished surfaces close off your options.
- Base your budget on site-specific quotes, clearly defined scopes, and realistic coordination demands.
- Choose DIY tasks around your skills and schedule without delaying the professional crews.
Table of Contents
- It Started With a Dream Shop, Not a Backyard Master Plan
- Scope Creep Doesn’t Always Look Like a Big Decision
- Pool Placement Is Really About Everything Around the Pool
- The Hardscape Works Only If the Hidden Stuff Works
- Build in the Order Your Equipment Needs
- Getting a Yard Back Felt Like a Major Milestone
- The Deck Finally Connected the House to the Backyard
- The Porch Details Made the Whole Project Feel Finished
- Outdoor Lighting Was the Final Transformation
- The Backyard Renovation Advice I Wish I’d Had Earlier
- Was the Dream Backyard Worth It?
- A Shop Upgrade for the DIY Parts
It Started With a Dream Shop, Not a Backyard Master Plan
When we bought this house about six years earlier, the backyard felt like a great blank slate. Huge trees, birds, nature, room to spread out. We had built a smaller backyard oasis with a pool at our previous house in Texas, so the idea wasn’t completely new.
The scale of this one was.
My first real customization here was the camp house shed in the back corner. That project pushed my skills harder than anything I had built before, and it planted the seed for something bigger: a dedicated workshop.
I had wanted my own shop since starting to make videos in 2017. We finally had the property for it, but the site came with a few small complications. And by small, I mean expensive.
- The yard dropped approximately 12 feet across the property.
- The shop location was about as far from the road as it could possibly be.
- The slope required an engineered retaining-wall foundation.
- Equipment and materials still needed a practical way to reach the building site.
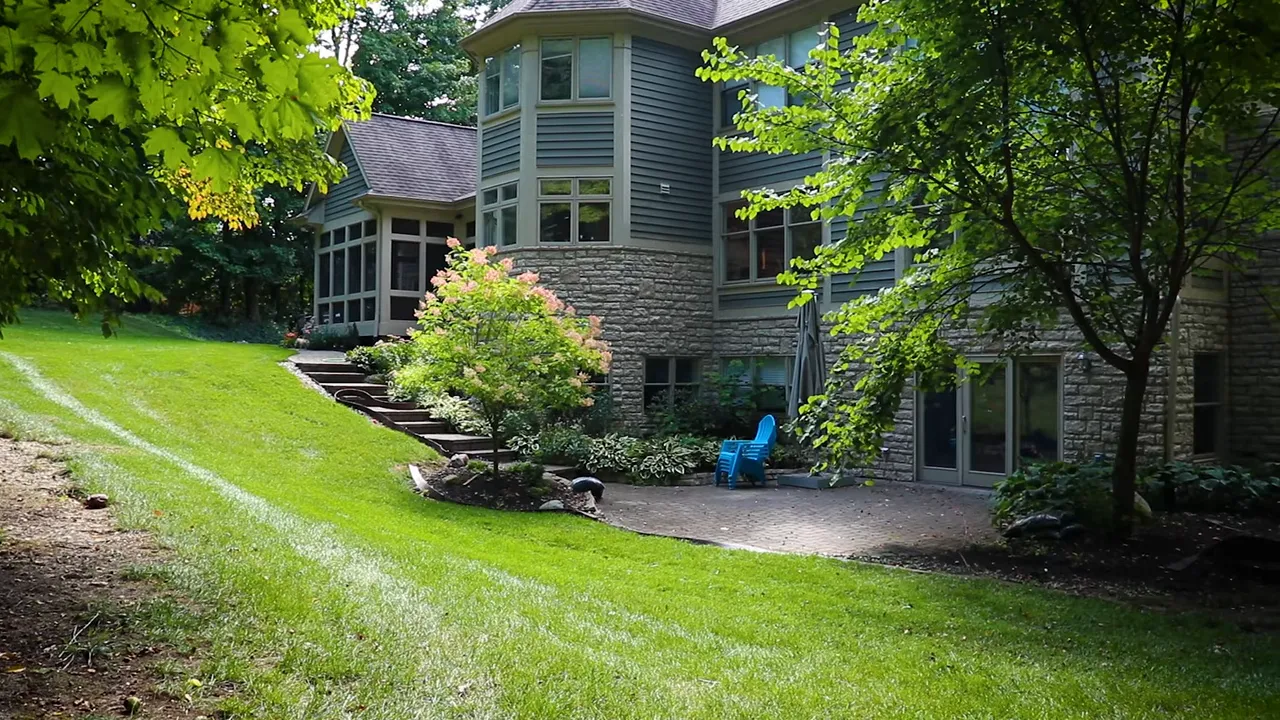
I kept putting the project off until my wife pushed me to do it. A wife encouraging her husband to build a dream shop? I was not going to waste that opportunity.
We cleared trees and worked with designers to fit the largest sensible building into the available space. The final layout was essentially a three-car garage with a bathroom. Because the roof pitch needed to match the house, we used the extra headroom for about 500 square feet upstairs, bringing the total usable area to roughly 1,500 square feet.
Then the first construction quote arrived: $315,000, without interior finishes.
Yikes.
More searching and negotiating brought the price down to something I could justify, although it was still a lot of money. I did the usual mental gymnastics about home value and using the space for business. What I didn’t fully understand was that the shop was about to set off a very expensive chain reaction.
Scope Creep Doesn’t Always Look Like a Big Decision
My wife had one nonnegotiable requirement for the shop: it had to look like it belonged with the house.
We matched the stone along the bottom, used cedar siding, and selected the same paint color. Easy enough, except the house’s paint had been fading in the sun for about 15 years. Fresh paint on the shop was never going to match perfectly.
And since the painters were already there, we painted the entire house, too.
The garage doors followed the same logic. The shop needed a new door. That new door wouldn’t match the older doors on the house. So those got replaced as well.
Scope creep often arrives disguised as a completely reasonable improvement. Each choice makes sense individually. Together, they can turn one project into several.
Apparently, you can fix almost anything with more money and a positive attitude. Unfortunately, the positive attitude doesn’t cover the invoice.
Pool Placement Is Really About Everything Around the Pool
Once the main shop work was done, we moved on to the pool. We went back and forth on its location before settling on a spot close to the shop.
Another designer helped us create a rendering, which forced us to think beyond where the water would go:
- How would we actually use the backyard?
- Where would people gather?
- Would furniture fit comfortably?
- How would the pool connect to the house, shop, and future deck?
- What would the transitions between different elevations look like?
That rendering gave us something concrete to work toward. It also made it much easier to explain the vision to the people responsible for building it.
A Pool Built From Rolled Fiberglass Sheets
Our pool construction was different from what most people probably picture. Rather than a one-piece fiberglass shell, the walls began as large rolls of epoxy-coated fiberglass sheets.
The crew unrolled and shaped those sheets, stiffened them with aluminum spars, and backed them with concrete poured into membrane pockets. That created a stiff, flat set of walls for the pool and spa.
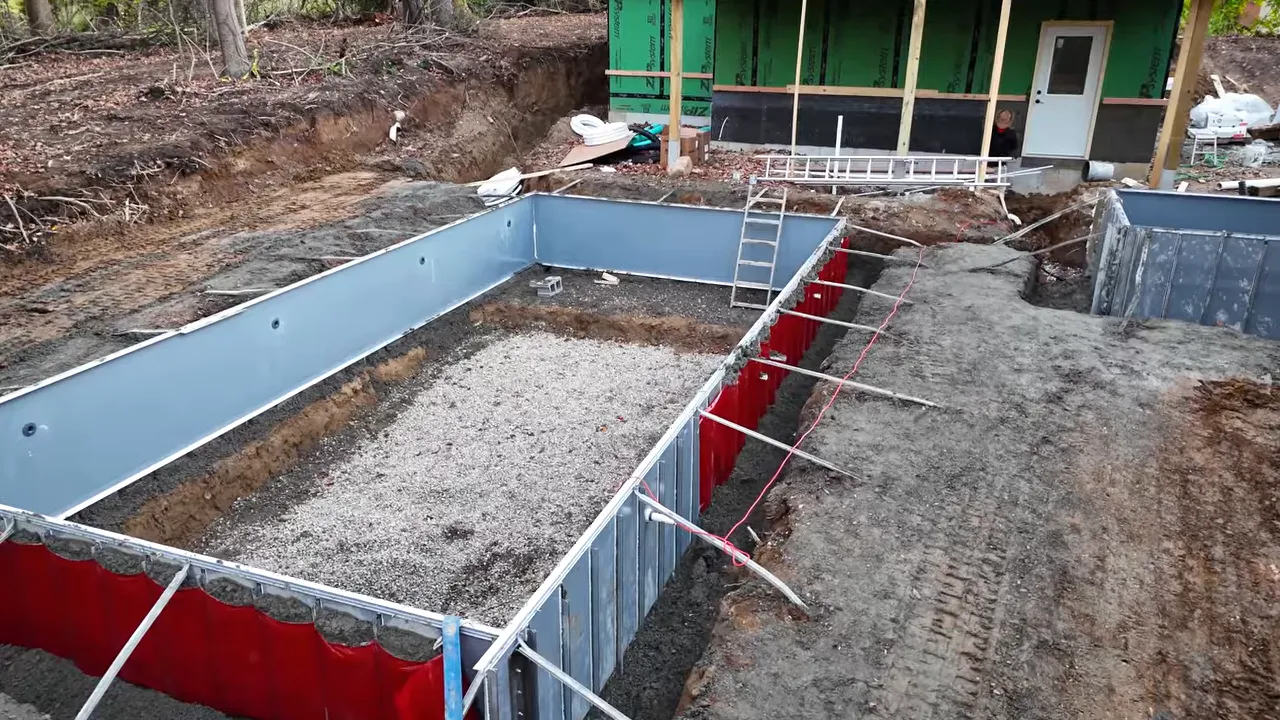
Buckeye Pools handled the installation. After the plumbing was in, the crew placed concrete inside to form the bottom.
The final epoxy coating came much later, after most of the messy paver cutting was finished. Between those stages, the pool briefly achieved a look I would describe as “decorative pond scum.” Not exactly the oasis we had ordered, but construction has its phases.
The Hardscape Works Only If the Hidden Stuff Works
This is where Rob Fowler from Lawn Innovations became absolutely essential.
Rob is the kind of person who will obsess over a difficult transition, drainage route, or stone placement until it works. On a project with this many moving parts, you need that person in your corner.
Our steep yard needed retaining walls, and we chose large stacked boulders. The natural edges fit the wooded property and gave the pool a backdrop that felt much more interesting than a plain wall.
The crew started at the front corner of the shop, then continued behind it and along the property line behind the pool. Gravel finally covered a huge portion of the mud, which was a pretty major quality-of-life improvement with a dog and small kids.
Drainage Comes Before the Pretty Surface
Before the patio went down, we routed a large drainpipe beneath it and connected the shop’s downspouts. Surface drainage and retaining-wall drainage were part of the planning, too.
I did not want to finish the backyard and then discover that water had nowhere useful to go.
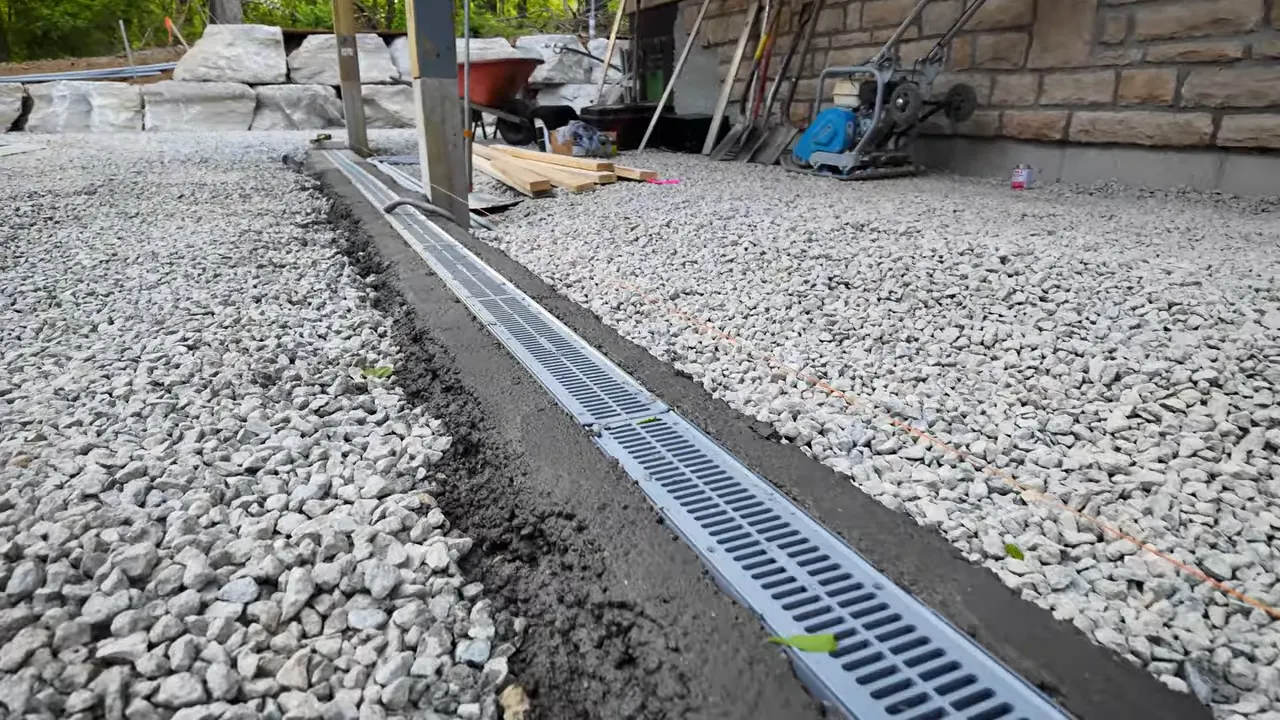
We also poured a foundation for the future outdoor kitchen and installed conduit runs for things we might want later. The spa construction had to account for its final position within the deck and patio design.
None of this was especially glamorous. All of it mattered.
The best time to plan something under a patio is before there’s a patio. Once the surface is finished, even a simple addition can become a removal-and-repair project.
The Pool Pavers and Coping
For the pool surround, we chose Valstone from Atelier Vals, a concrete product made to resemble natural stone. I discovered it in a showroom and loved the look.
The company makes the material in Kentucky, in a cave of all places, and offers custom-cast pieces. That custom capability became particularly useful when we planned the lighting around the spa.
Our selection was:
- Size: 36 by 24 inches.
- Layout: Staggered.
- Color: Alps White.
- Finish: Envy.
The precision and speed of the installation crew made me very glad I wasn’t tackling that part myself. I had originally entertained the idea. That confidence faded pretty quickly once I saw what doing it well actually involved.
We also poured the driveway extension connecting the existing driveway to the shop. Besides making the building easier to use, it established an edge that the remaining pavers could meet.
Once the cutting was mostly finished, the pool received its final coating and was filled. Rob then cleaned and sealed the pavers to help protect that fresh surface from dirt and staining.
Build in the Order Your Equipment Needs
One of the least obvious parts of a backyard renovation is that the construction sequence isn’t just about what you want to finish next. It’s about what you can still reach.
We installed the deck foundation piers well before I was ready to build the deck. Why? Because access for equipment was about to disappear.
Rob and Shawn already had equipment on-site, so they knocked out the piers while they could still get to the area. Waiting would have made the same task much more difficult.
That became a recurring theme: finish the heavy-access work before your beautiful finished work blocks the route.
A Giant Boulder Wall Is a Giant 3D Puzzle
The largest retaining wall allowed us to create the upper deck area and a lower patio roughly eight feet below it, finished with more Valstone pavers.
With a large excavator and tiltrotator attachment, Rob and Shawn prepared the foundation beds and positioned each course of boulders. It was basically a giant 3D jigsaw puzzle, except the pieces required heavy machinery.
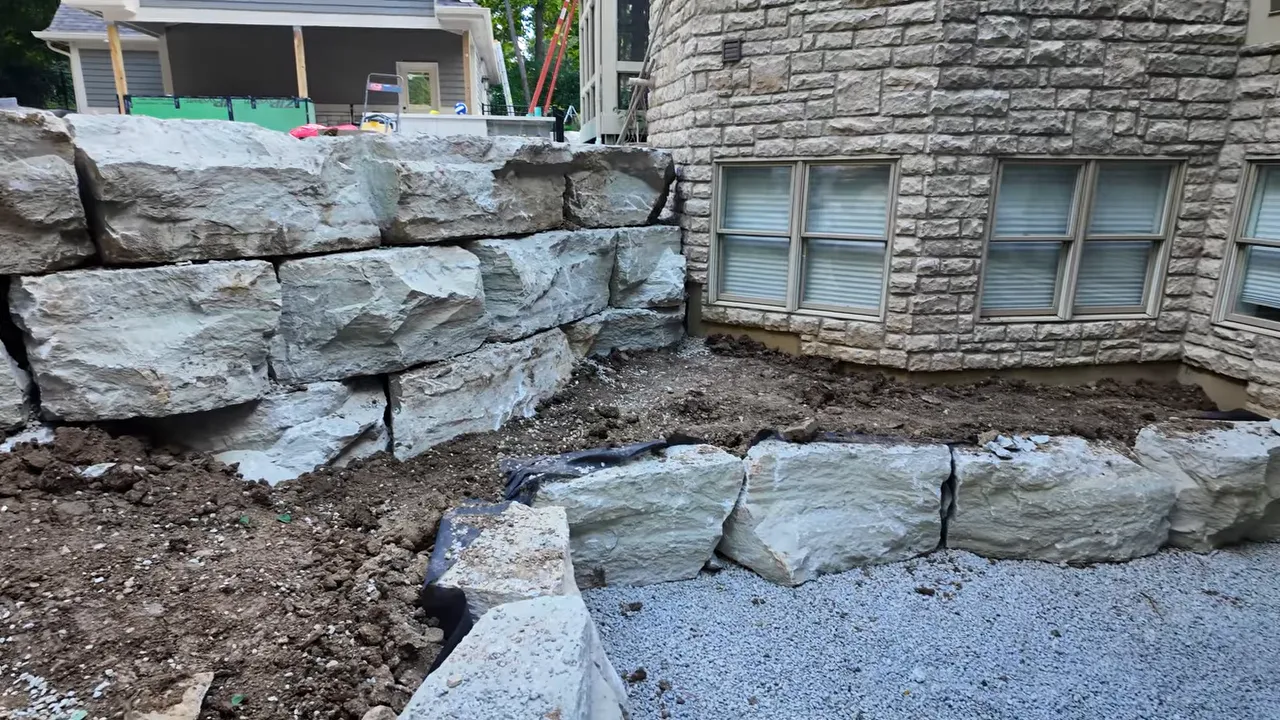
The stairs between levels were especially tricky. We had to work around the depth of a new two-inch gas line, the neighboring property’s slope, and elevations that were difficult to visualize while everything was still torn up.
That is not a place to improvise with an excavator. For your own excavation planning, Call 811 is a useful utility-location resource.
Rob later estimated that the project used somewhere between 150 and 200 tons of large erosion-control rock, not including loose aggregate. We briefly attempted to express that in blue whales, which did absolutely nothing to improve the accuracy of the estimate.
Before the big excavator left, the crew tied the drainage together and graded the remaining slopes. Those final machine tasks mattered just as much as setting the impressive rocks.
Getting a Yard Back Felt Like a Major Milestone
By this point, we had accumulated a substantial pile of brush. My wife suggested consolidating it in the clearing for a big bonfire, which became a neighborhood-kid magnet almost immediately.
I’m not sure it saved much work, but it did provide a brief break from thinking about construction details.
Then it was time for me to make a more useful contribution: the outdoor kitchen.
I had been looking forward to cooking outside throughout the project, and finally building the kitchen made the space feel much closer to usable. I documented that project separately in the complete outdoor kitchen build.
With the heavy work moving out, we could restore the landscaping. We cleaned up brush near the front corner of the shop, regraded, and added grass where the kids tend to play.
The former construction access road had been a dirt route for well over a year. Getting fresh sod down there felt ridiculously satisfying. After that much mud, grass starts to look like a luxury finish.
The Deck Finally Connected the House to the Backyard
The last major structure was a 600-square-foot deck replacing our worn-out sunroom.
I tore the old room apart and spent about a month building the deck. It finally connected the house to the pool area in a way that felt natural, rather than like several separate projects occupying the same yard.
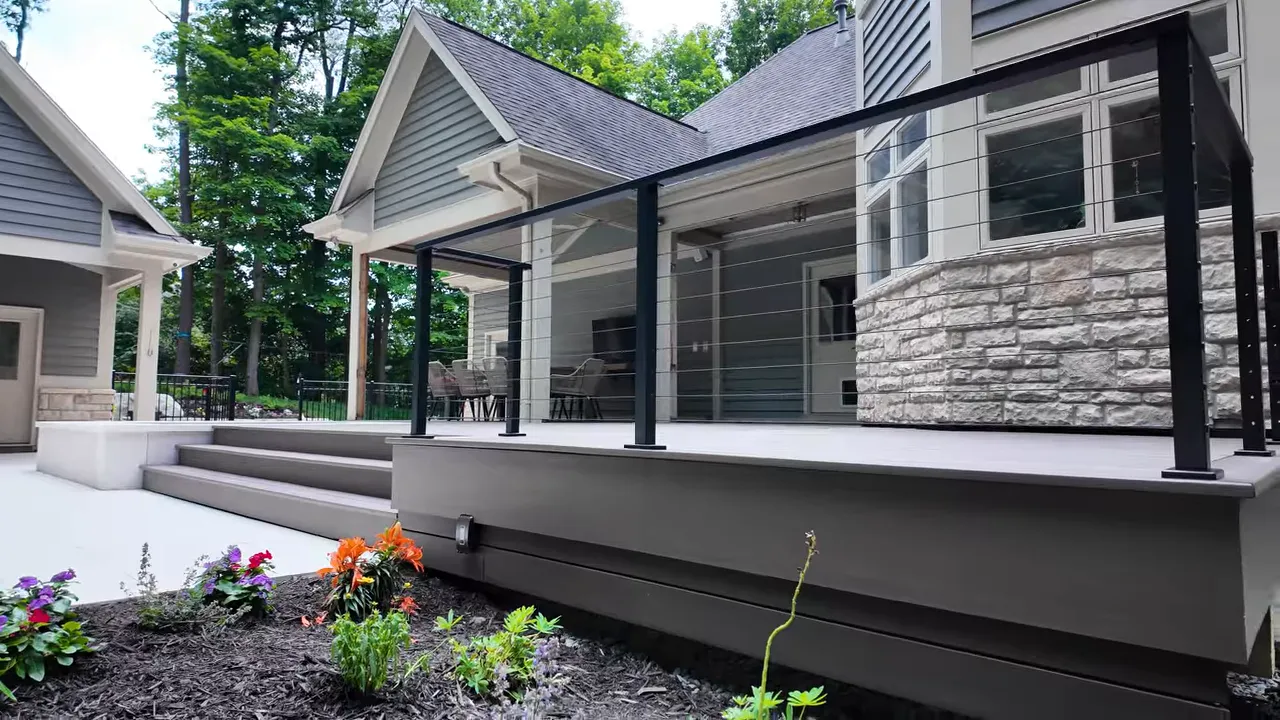
The full deck build gets into the individual construction decisions, but the big lesson here is about connection. The pool, patio, and shop were all useful individually. The deck made the whole backyard feel like a place to spend time.
Of course, that meant the covered porch beside it now needed attention. Because apparently we had not renovated enough things yet.
The Porch Details Made the Whole Project Feel Finished
I replaced the trim removed during demolition with fresh cedar and ran speaker wire for an additional audio zone before covering everything up.
That wiring route looked pretty clever at the time. Whether future me manages to put a screw through it is another question.
A Prefinished Wood Ceiling Instead of Old Beadboard
The old beadboard ceiling would have been fine. But after coming this far, I wasn’t particularly interested in fine.
I wanted to walk outside with a cup of coffee, look up, and feel proud of what we had made.
To match the shop’s covered porch, I used Synergy prefinished wood in the Colonial color from Advantage Lumber. I had originally purchased the material for the shop as a regular customer, then approached them about partnering on this porch renovation.
Before installing the boards, I wired in new LED puck lights.
The feature I especially liked was the end-matched tongue-and-groove construction. The boards interlock along their long edges and short ends, so the end joints don’t all have to land on ceiling framing in the same way ordinary butt joints would.
For this installation, that meant:
- Faster progress overhead.
- A more random-looking arrangement of joints.
- Less material lost to offcuts.
The angled ceiling transition required some creative cuts. I ripped matching angles on the short pieces and used a dark marker to disguise a few exposed raw edges. By the time I finished, the leftover scrap pile was surprisingly small.
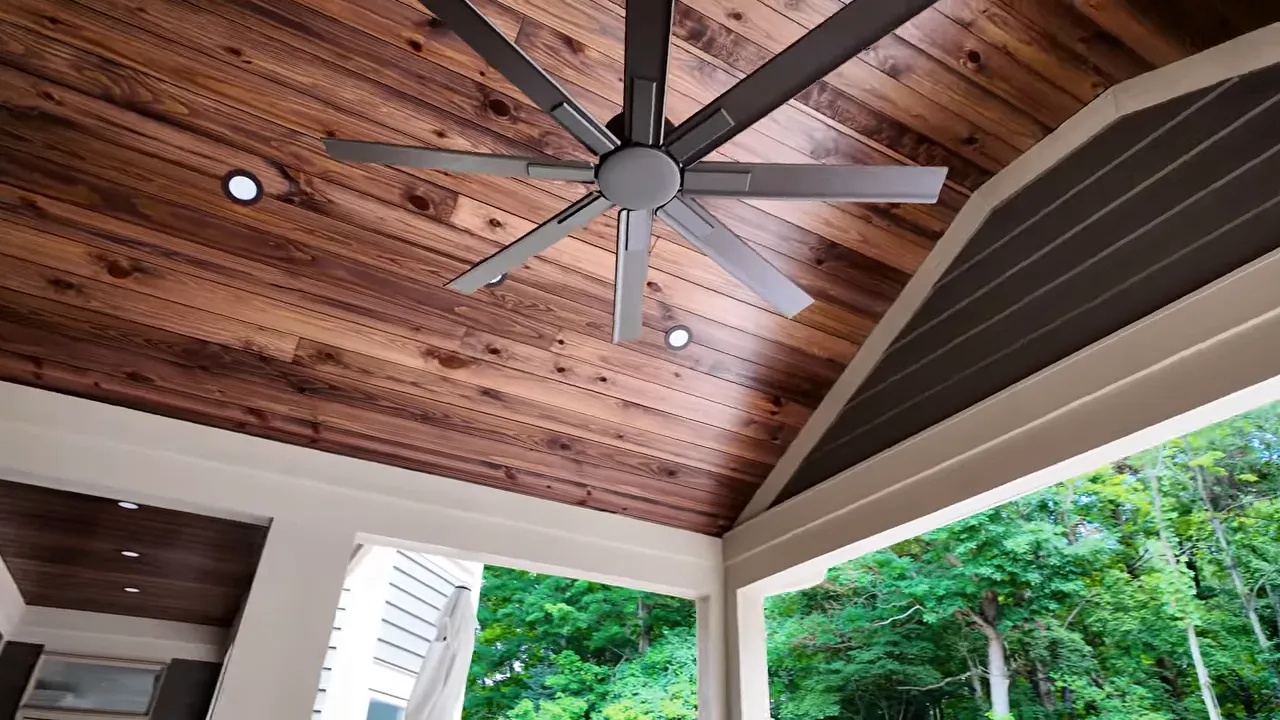
I finished the remaining cedar trim, wrapped the lower column sections with PVC trim to keep water off the underlying wood, and brought the painters back. We had intentionally left this area out of the earlier house painting because we knew it would be rebuilt.
The final railing sections used a black Muzata cable railing system. Assembly took some time because there are plenty of small parts, but I really like the finished appearance.
Audio That Fits the Area You’re Actually Using
I had already installed Sonance speakers around the pool and had been happy with them, so I added a separate set under the porch.
That zone lets us route TV audio through the porch speakers on game days or play background music without cranking up the entire pool area.
The old 55-inch TV also gave way to a 75-inch screen after some additional power work and wiring cleanup. Clearly, the old one had become impossibly tiny. That’s my story, anyway.
Outdoor Lighting Was the Final Transformation
At night, the backyard becomes a completely different space. The last big job was adding LED strip lighting around the deck and spa, plus landscape lighting for the stonework, plants, and trees.
The Lighting Channels Were Planned Months Earlier
When we ordered the spa coping, we had a lighting channel cast into it. The deck also had channels incorporated during construction.
That clean, tucked-away result was only possible because we planned for it before the finishes were installed.
I used custom-length outdoor LED strips sized for each segment. I also went back and glued the strips in place because I was not particularly confident that the factory adhesive backing would hold outdoors indefinitely.
The strips I selected had a maximum run length of 32 feet. That was a limit for my particular system, not a universal rule for every LED strip. During the deck build, I ran wire to the start of each separate lighting run so I could stay within that limit.
Connections were a mixture of heat-shrink connectors and soldered joints, hidden so the hardware wouldn’t interrupt the finished look.
Landscape Lighting Needs a Nighttime Adjustment Pass
For landscape fixtures, I chose VOLT lighting after spending plenty of time researching options. Kichler was another brand I considered worthwhile. I had no affiliation with either company.
I originally considered hiring a lighting contractor, but the potential savings convinced me to install the system myself. I used the rocks, larger plants, and selected trees as focal points.
The first nighttime test was encouraging, but the deck strips were much too bright. We were going for relaxing backyard, not alternate airport runway.
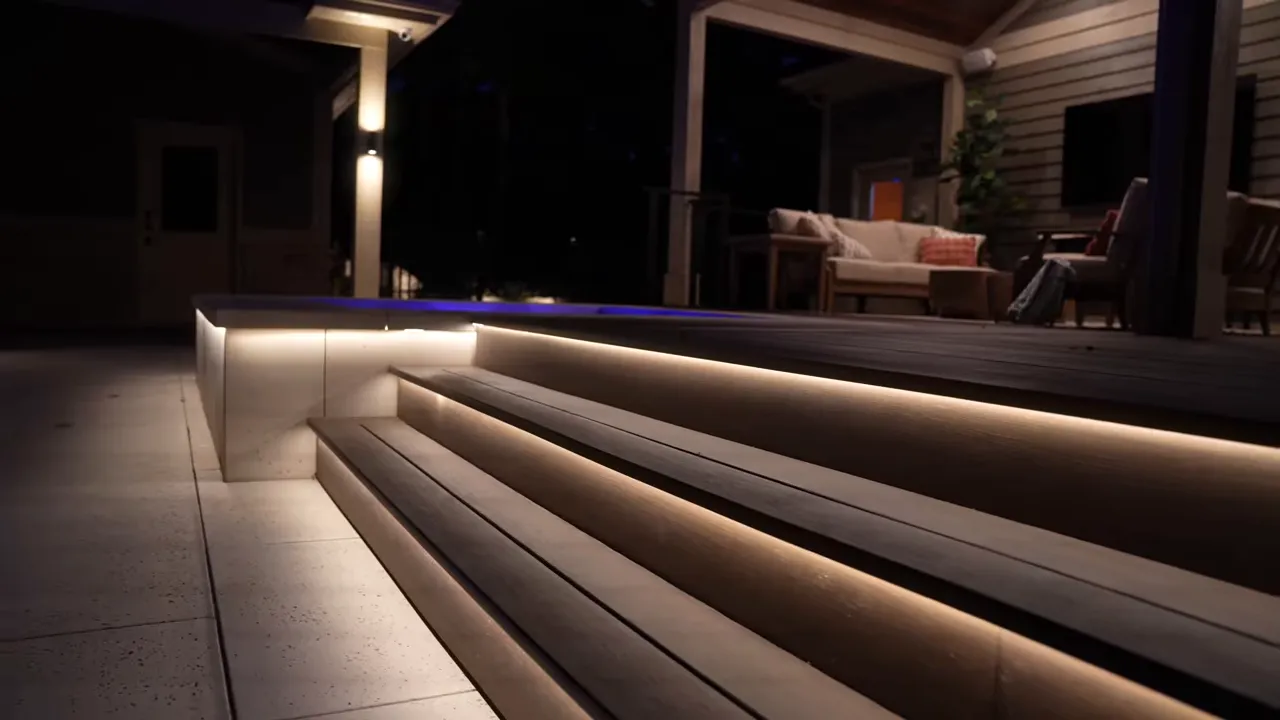
That final adjustment mattered. Installing lights and getting the lighting right are two different jobs.
The Backyard Renovation Advice I Wish I’d Had Earlier
Once we were finished, I asked Rob what homeowners most often get wrong, where money is well spent, and where it isn’t. After living through this project, his answers hit pretty close to home.
1. Big Design Changes Late in the Project Are Expensive
Rob’s biggest warning was about changing the design after infrastructure is already installed.
A new feature may need electricity from a direction you can no longer access. A bathroom might need a sewer connection beneath finished hardscape. A retaining-wall change may have to work around plumbing that is already buried.
The workarounds add up through longer trenches, demolition, remobilization, and delays.
Our outdoor kitchen foundation and extra conduit were additions to the original hardscape scope. The retaining-wall approach also changed. None of those choices was fatal, but they affected sequencing and pushed work into colder weather. A phase expected around September ended up largely happening in December and January.
2. A Fixed Price Only Stays Fixed if the Scope Does
Rob regularly works on fixed-price hardscape and landscape projects, and those can stay on budget when the agreed work stays consistent.
A whole-backyard renovation is harder to coordinate because each specialty has its own scope and schedule: pool builder, building contractor, deck work, utilities, audio, lighting, and landscaping. Add weather, and the overall duration starts stretching.
Even the patio base needed careful pricing assumptions. Rob described separating the specified compacted base from additional material needed to bring lower areas up to that level. Understand what your quote includes and what remains an allowance or additional charge.
3. Site Access Can Make Online Cost Estimates Useless
Square-foot pricing and online estimates can provide a broad starting point, but they don’t know your property.
Our driveway, slope, and retaining walls all affected how crews could move material. Once access changed, equipment sometimes had to lift materials into areas it could previously reach more directly. That reduces efficiency.
Rob’s recommendation was to identify who will lead the project, have that person coordinate the trades, and get the scopes and pricing refined on paper.
He suggested that management might cost roughly 10% to 15% of the work under that contractor’s oversight. That was a ballpark from our conversation, not a quote for every project. The value is in coordination, established trade relationships, and avoiding preventable inefficiencies.
A homeowner can manage a project, as I largely did, but should expect a learning curve rather than assuming that skipping a management fee automatically saves the full amount.
4. Design and Empty Conduit Can Be Excellent Investments
When I asked what seems expensive upfront but proves worthwhile, Rob went straight to design.
He gave rough examples of around $500 for an initial rendering and concept, and up to about $2,500 for a more comprehensive design. Construction documents, architects, and structural engineering can cost substantially more.
The point wasn’t a universal design price. It was that moving things around on paper is much easier than moving them after construction.
We used two design passes, and both helped. One difficult corner alone required extensive work to reconcile elevations, the property boundary, stairs, and retaining walls.
Conduit was the other investment Rob emphasized. On a project this size, he considered roughly $2,000 in conduit runs plausible. Spending money on empty pipe you bury and never admire can be a tough sell, right up until you need to run something through it.
Photograph and document those buried routes before they disappear. Future you will appreciate something more precise than “I’m pretty sure it goes over there.”
5. Don’t Buy Yourself a Maintenance Hobby by Accident
The backyard is supposed to help you relax. Complicated features can work against that goal if they require more troubleshooting than you enjoy.
Rob cautioned against accepting every technology upgrade simply because it sounds impressive. If you love that stuff, great. If not, an unreliable feature can become one more thing to be annoyed about while you’re trying to unwind.
We also agreed that expensive built-in griddles deserve careful consideration. Rob had seen clients disappointed by the warm-up time and cooking performance of some models with thick stainless plates, despite prices starting around $2,500 or more.
In our kitchen, I use the pellet smoker and grill about 99% of the time. I don’t hate the griddle, but cooking much beyond vegetables has been slower than I’d like. An expensive built-in is not automatically the appliance you’ll enjoy most.
6. DIY Savings Depend on Your Skills and Your Timing
Want to help with the work? Have that conversation with your primary contractor early.
A good contractor can identify pieces you can reasonably take on while the crew handles the rest. Trim carpentry might make sense for one homeowner. Another person’s best contribution might be selecting finishes and staying out of the excavator’s way.
The expensive mistake is promising to finish a task, missing the deadline, and having a crew arrive with the wrong equipment and nothing productive to do. Sending four or five people away can erase a lot of supposed savings.
I’m glad I built parts of this project myself. I’m equally glad I did not lay the entire pool patio.
7. Shop Your Finishes Before Cutting Essential Work
There are savings beyond doing more labor yourself.
Rob pointed to railings as an example. Moving from a basic powder-coated aluminum option to glass can nearly triple the railing cost per linear foot. That choice can dramatically change a deck budget.
You might prioritize a premium countertop while choosing a more economical facing material. You might spend more where the finish matters most to you and less where it doesn’t.
The goal is not to make every component the cheapest or most expensive option. It’s to decide where the upgrade actually improves your experience.
8. Professionals Sell You Time as Well as Expertise
Rob’s argument for hiring specialists was simple: you don’t know what you don’t know.
You can complete most of a job correctly and still miss one critical step, such as waterproofing, that forces you to tear things apart later. Experienced tradespeople should bring efficiency and judgment along with their labor.
They also give you time back. Jobs, kids, activities, weekends: all of that belongs in the decision about what you should do yourself.
Was the Dream Backyard Worth It?
If Rob could add anything, he’d choose a gas fire feature. He also floated the idea of a TV that rises out of a wall-integrated cabinet, which sounded dangerously appealing for a conversation that had just covered avoiding rework.
That is probably the final lesson: even when a backyard is finished, there will always be another cool idea.
For us, the important part is that the original goal survived all the delays, mud, and scope creep. We now have a backyard that works for our family, connects naturally to the house, and feels like somewhere we actually want to spend time.
Plan the whole space, protect the hidden infrastructure, and find people who care about the details. Then be honest about your budget, your time, and your own skill set.
After two years, finally taking a seat out there felt amazing.
Right up until my wife asked about redoing the front yard.
A Shop Upgrade for the DIY Parts
If your own projects involve a miter saw spraying sawdust everywhere, that frustration is why I developed our custom aftermarket dust collection chutes. We make options for many major saw brands, designed to replace the factory chute and improve collection. Most install in about three minutes. What started in my garage has become a manufacturing business here in Ohio, and that support helps keep projects like these going.
|


