A $65,000 deck quote is an excellent motivator to learn how to build a deck.
That was the number staring back at me as we approached the last major piece of our backyard transformation. We had already built the shop, pool, and outdoor kitchen. What remained was connecting everything with a big composite deck and turning an unused sunroom into an open, covered outdoor living space.
The small problem? I had never built anything quite like it. Naturally, I decided to do most of it alone.
My goal was to spend roughly one-third of the contractor’s quote by supplying the labor myself. I finished at $23,400 before the optional lighting upgrade, saving 64% against that quote. But that number comes with a substantial amount of sweat, a few narrowly avoided disasters, and a much healthier appreciation for professional deck builders.
Key Takeaways
- The deck cost $23,400 before optional lighting, saving 64% against the $65,000 contractor quote.
- Hiring specialists for foundations and the structural header kept the largely solo project manageable.
- Finished decking patterns, lighting, and railing locations needed planning before the framing was complete.
- The savings required roughly three weeks of hard labor, plus planning and a seasonal delay.
Table of Contents
- The Plan: Turn an Unused Sunroom Into One Big Outdoor Space
- Foundation Piers: The First Job Worth Hiring Out
- Demolition Revealed Two Problems I Should Have Found Earlier
- Starting Over With the Old Deck Framing
- Building a Flat Frame Takes More Than Buying Straight Lumber
- Installing New Ledgers Meant Cutting Into the House
- Joist Sorting, Blocking, and Thinking Several Steps Ahead
- Plan the Finished Board Layout Before Trimming the Frame
- The Stairs Required More Math Than I Expected
- Three Jobs Before the First Deck Board
- Composite Decking: Start With the Reference, Not Necessarily the House
- Breaker Boards and Picture Framing Made the Biggest Visual Difference
- Black Cable Railing Kept the Backyard Feeling Open
- The Details I Still Needed to Finish
- DIY Deck Cost Breakdown: $23,400 Versus $65,000
- Was Building the Deck Myself Worth It?
- Project Sponsor: Backup Power That Also Helped on the Job
The Plan: Turn an Unused Sunroom Into One Big Outdoor Space
This project was more ambitious than attaching a rectangular platform to the house. I wanted to strip the enclosure off our existing sunroom, preserve the covered area, and extend the deck toward the concrete spa and surrounding pool hardscape.
Sunrooms sound great in theory. Ours mostly occupied square footage we never used. Opening it up would make it possible to move freely between the covered seating area, spa, and rest of the backyard.
I worked through several concepts, then partnered with Courtney at Diamond F Co to turn them into a proper set of plans. With the permit approved, I could finally start making expensive things happen.
This was a permitted project with plans, professional help on selected tasks, and an engineering consultation for a tricky connection. The dimensions and fastening details below describe my deck, not a universal recipe. Structural changes need to be checked against the actual loads, materials, local requirements, and approved design. The American Wood Council is a useful starting point for wood construction and deck design resources.
Foundation Piers: The First Job Worth Hiring Out
The new deck needed 18-inch-diameter concrete piers extending below our local frost line. Their location was awkward, and a future boulder retaining wall would eventually box the area in.
I enlisted Rob, who handled our pool hardscape and boulder wall, and Shawn from FCS Construction to help get the foundations installed.
Shawn’s excavator had a tiltrotator bucket, which gave him precise control while delivering concrete into the Sonotubes between the house and hardscape. That was a much better solution than me trying to invent some miserable concrete-delivery obstacle course.
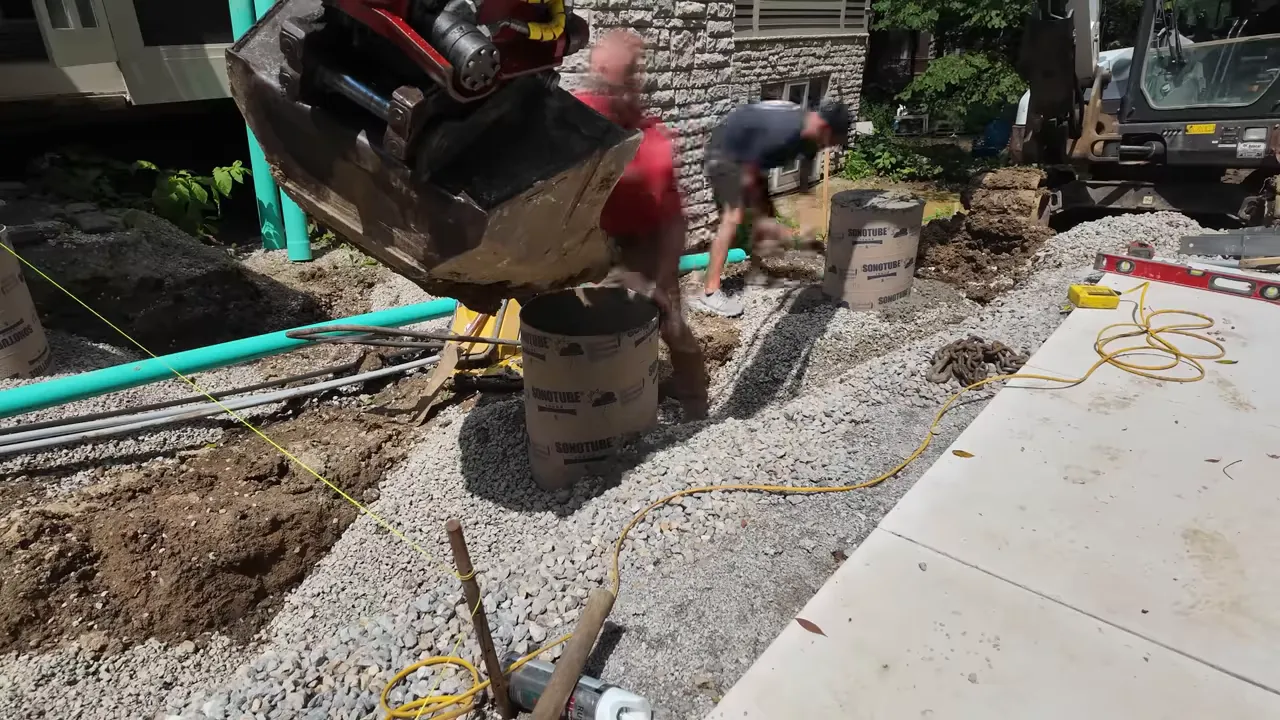
Unfortunately, I nearly made a major elevation mistake before we poured. In my head, I had pictured the new joists attaching to the sides of the beams. The actual design had them sitting on top.
That difference matters. A lot.
At the last moment, I asked for the piers and brackets to be set about two inches lower than I had originally intended, just to leave some room. That extra margin saved me later.
Then the project sat. We were finishing other backyard work, the weather turned cold, and my enthusiasm for outdoor framing dropped along with the temperature. The piers went in during one season; serious demolition resumed the following spring.
Demolition Revealed Two Problems I Should Have Found Earlier
I had been thinking about this renovation for roughly two years. That planning included studying the house framing and the original drawings, which helped me understand the covered area’s scissor trusses and load paths.
Still, drawings do not reveal everything hiding behind trim.
The Center Column Was Not Optional
I wanted one wide opening between the covered area and spa. A center column would interrupt the flow and, more importantly, sit directly between the hot tub and the television. Clearly, a serious design concern.
My hope was that the existing header ran continuously across the opening. Once I carefully removed the trim, I found two separate headers meeting over the center support.
Removing that column without changing the header would have left both pieces unsupported. That is the sort of open concept nobody wants.
The easy option was keeping the center column and accepting two openings. My wife rejected that proposal immediately.
After discussing the situation with several people, I hired professional framers. Their recommendation was a double LVL spanning the opening. I also wanted to avoid destroying the surrounding exterior finishes while wrestling the old headers out and the new beam in, which was not a realistic solo job.
The crew arrived around 7:30 a.m. and finished before 2 p.m. They replaced the header, preserved the trim I was worried about, hauled away their debris, and left a clean work area.
The $2,000 header replacement was one of the best decisions of the project. DIY does not require personally performing every task, especially when someone else has the equipment, experience, and crew to do it safely and efficiently.
The Existing Deck Framing Was at the Wrong Height
The second surprise involved the old perimeter framing. The existing deck boards terminated against the rim boards instead of sitting over them.
I had already set the concrete spa elevation using the old finished deck as my reference. I wanted the new deck surface to continue toward the spa at that height, but the taller perimeter boards were now in the way.
The spa was concrete. Adjusting that was not on the menu.
My choices were lowering the perimeter framing or trimming about an inch from its top. In this particular structure, the existing members were nominal 2x12s, larger than the nominal 2x10 depth needed for the application. After checking the situation, I trimmed them and transferred the existing ledger elevation around the perimeter.
That is not permission to casually shave down structural lumber. Check the required member size and load path before changing anything structural.
The bigger lesson was obvious: I should have exposed this framing before locking in the spa elevation. A little earlier demolition would have prevented a lot of later head scratching.
Starting Over With the Old Deck Framing
About five years earlier, I had replaced the original wood decking with inexpensive Trex composite. It was an improvement, but living with it taught me what I wanted to change.
- Eliminate unnecessary butt joints. The scattered board-end joints never looked particularly clean and became more noticeable over time.
- Fix the springy areas. During the previous renovation, I added 2x8 joists between the original 2x10s to save money during the 2020 lumber-price madness.
- Build a consistent frame. Rather than keep adapting around those compromises, I removed all the joists and started fresh.
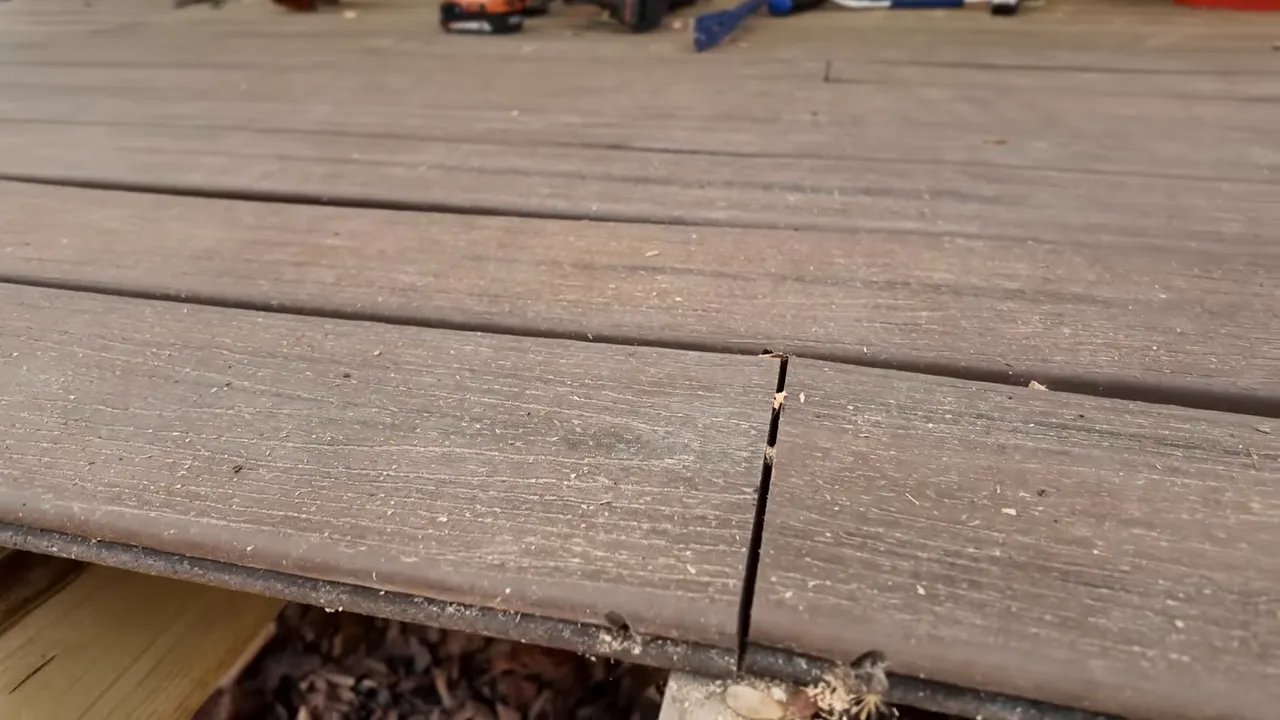
Removing the old hangers was slow, repetitive work. By the time I finally had a clean ledger and cleared perimeter, I was ready for something that felt more like building than undoing.
First, though, I cleaned the job site.
I am very good at telling myself there is no point cleaning because everything will just get messy again. The professional framers were a useful reminder that a tidy work area makes the next operation easier. It also gives my brain a clean slate instead of one more excuse to avoid the project.
I added a second framing member at the transitions where joists would terminate on one side and continue into a new section on the other. That involved notching the existing posts and through-bolting the added members so the opposing joist runs had their intended connections.
Building a Flat Frame Takes More Than Buying Straight Lumber
The old lag-bolt locations and holes from previous hangers complicated the new layout. Once I found a workable arrangement, I transferred it across to the opposite side.
The plans called for 2x10 joists at 12 inches on center. Working around existing fasteners, wiring, and other obstacles took some patience, but that was the layout I worked toward.
Crown Every Joist and Give Yourself a Third Hand
I checked each joist for crown and marked its orientation with a large arrow before installation.
Because I was working alone, a temporary helper bracket supported one end while I attached the other. After tacking a joist into place, I installed its hangers.
The surprise MVP was a palm nailer. It saved my arms and reached places where swinging a hammer would have been a miserable experience. Apparently, I was late to the palm-nailer party. I understand the enthusiasm now.
Set the Beams From the Finished Deck Reference
The new beams were built from wet, 16-foot-long 2x12s. Moving those alone was exactly as enjoyable as it sounds.
The longest beam run was about 24 feet, requiring splices over the foundation supports. I aligned the top edges before fastening the plies together, then used a spare joist to compare the new beam elevation with the existing deck plane.
This was the moment when my foundation-height mistake either became a story or a financial event.
Fortunately, the beam was slightly low, not high. I could bring it up with composite shims at the supports rather than rebuild the foundations or redesign the beam.
Once the beams and reference joists were where they needed to be, I secured the support brackets with two half-inch galvanized through-bolts at each connection. I also covered the beam tops with wide joist tape before installing permanent joists over them.
My approved drawings called for a two-ply 2x12 beam. I was very happy to keep building what was drawn instead of inventing an alternate solution under pressure.
Installing New Ledgers Meant Cutting Into the House
Until this point, much of the work involved renovating an existing structure. Installing the new ledgers meant establishing my own elevations and cutting into the stone veneer.
This was the part that had me lying awake, staring at the ceiling.
I used a laser level and a story stick referenced from the existing house ledger to mark the new framing elevations. Then I marked higher cut lines so the finished deck boards could tuck below the stone.
After snapping chalk lines, I cut and removed the veneer where the new framing needed to connect.
Ledger Waterproofing Needed Its Own Sequence
For the newly exposed wall areas, my installation sequence was:
- Cover the exposed OSB with overlapping butyl membrane.
- Set the new ledger framing using the established deck plane.
- Attach it with structural ledger screws in the staggered pattern required for my project, which was 12 inches on center.
- Provide clearance above the ledger for metal flashing.
- Overlap additional membrane with the earlier layer, install the flashing over the ledger, and tape over its nail heads.
I initially failed to leave enough space above the ledgers for the metal flashing. With ordinary siding, you may have some ability to tuck flashing behind the material. Stone does not politely move out of the way. I had to cut approximately three more inches of clearance.
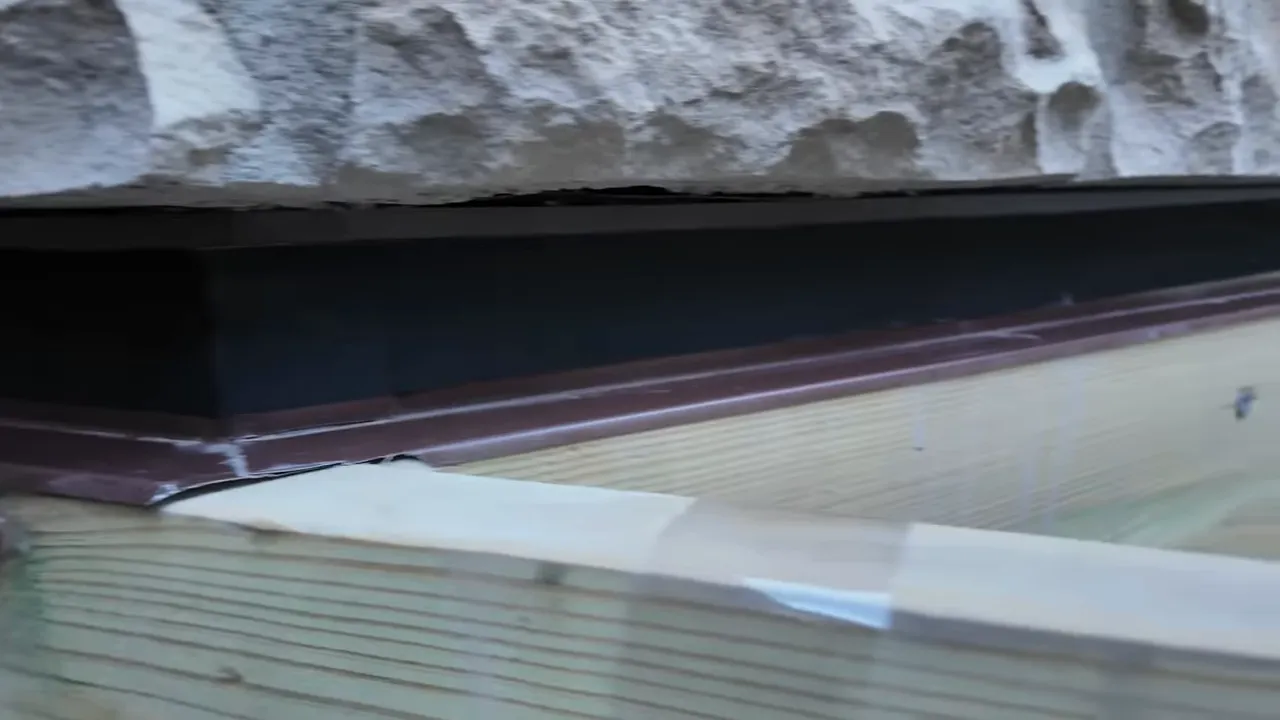
The existing ledgers were a compromise. They had survived more than 25 years without obvious major deterioration, and I added protective tape along their tops. But I knew removing the lower trim and installing proper metal flashing would have been the more complete approach.
Tape on an old ledger is not equivalent to a properly integrated flashing system. The goal is to manage water at the house connection, not simply cover visible wood and hope for the best.
Joist Sorting, Blocking, and Thinking Several Steps Ahead
Treated lumber is not dimensionally identical just because the tags all say 2x10.
My joists ranged from roughly 9¼ to 9½ inches deep. When joists sit on top of a common beam, placing the deepest one beside the shallowest one creates an immediate height difference.
I sorted them into depth groups, crowned them, and arranged them so the change was gradual rather than abrupt. I started with a deeper joist at the outside edge and stepped toward shallower pieces nearer the middle.
To establish the outside geometry, I squared an end joist with the 3-4-5 method and used its position to determine the beam’s final cut length.
As the framing progressed, I installed hurricane ties and blocking in manageable sections. Waiting until every joist was installed would have made reaching some of those connections much harder.
The connection spanning toward the spa was another place where I asked for help. Securing the ledger to blocking was not a detail I wanted to guess about, so I consulted a licensed engineer in Ohio before proceeding.
Install Buried and Hidden Items While You Still Can
Before closing the framing above it, I installed the in-ground outdoor subwoofer. Digging that hole afterward would have been a pretty ridiculous way to spend an afternoon.
The same planning applied to:
- Blocking beneath future cable-railing posts.
- Support beneath picture-frame borders and breaker boards.
- Electrical routing beneath the deck.
- Low-voltage wiring for future perimeter and stair lighting.
- Access to equipment that would eventually sit below the finished surface.
Projects like this constantly test the line between diligent planning and becoming an overthinking lunatic. I spent plenty of time on both sides.
Plan the Finished Board Layout Before Trimming the Frame
I intentionally left the projecting joists long until I could work backward from the decking layout.
The goal was a full-width board at the visible front edge, with the correct overhang and room underneath for an LED channel. I did not want to discover at the end that the entire front needed a strange, skinny strip.
First, I established a reference line through the deck. The main house wall and spa coping were roughly parallel, making them useful references. One smaller wall section was not parallel, which is a good reminder that houses are not perfect geometry exercises.
I checked multiple locations, accounted for the rim, fascia, board widths, gaps, and overhang, then snapped the final cut line and trimmed the joists.
Pick a reliable reference and stay consistent. Trying to make every imperfect surface the controlling reference is a great way to make yourself crazy.
The Stairs Required More Math Than I Expected
I owned a framing square. That felt like a promising start to building stairs.
Actually laying them out took much longer than I expected because I needed to account for the fascia, risers, tread boards, picture-frame returns, and finished overhangs together.
I worked through those layers before cutting the stringers, then built the stair framing in two sections. Even split in half, the assemblies were surprisingly heavy for two steps.
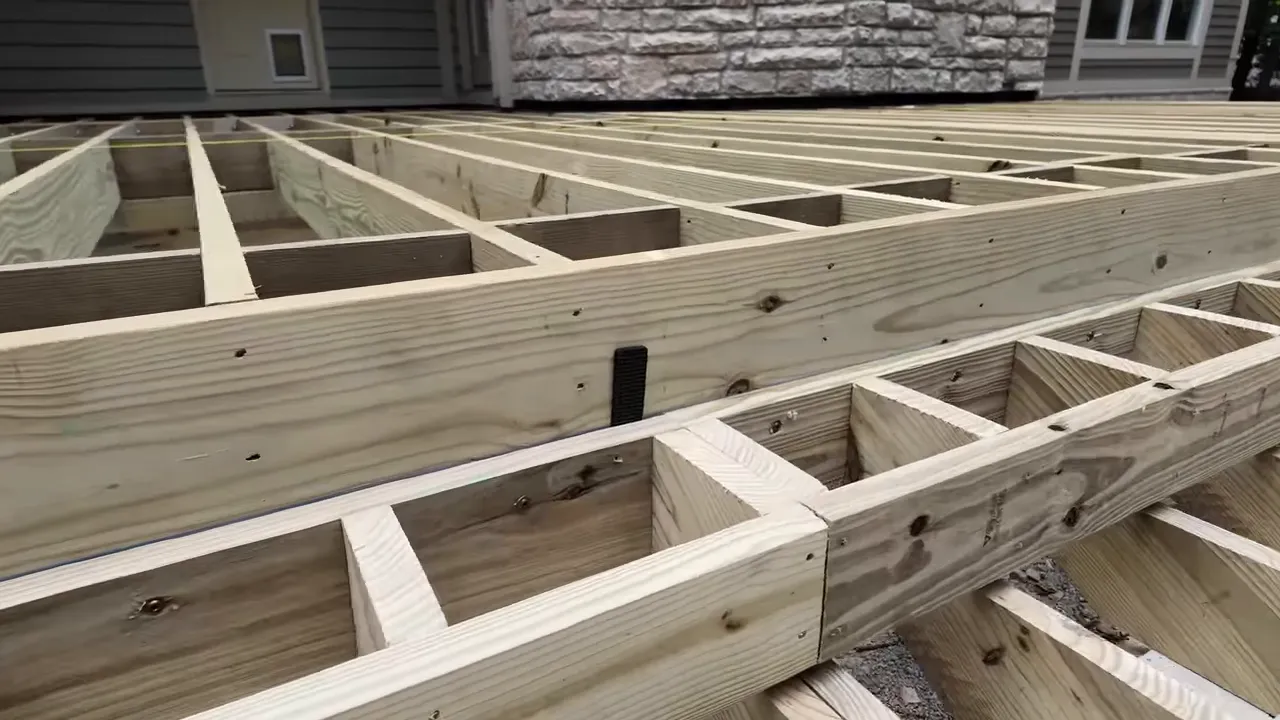
After maneuvering everything into position and shimming it level, I was pleasantly surprised with the result. My imaginary grumpy old carpenter might not have applauded, but I do not think he would have thrown his pencil at me.
With a few final support pieces added, the framing passed inspection on the first try.
Three Jobs Before the First Deck Board
Passing framing inspection made me want to start throwing decking down immediately. There were still three important jobs to finish first.
1. Finish the Under-Deck Wiring
I added a conveniently located outlet at the front of the deck for the pool-cover pump and pool-cleaning robot. That meant no more long extension cords stretched across the pool patio.
I also ran the low-voltage wiring to the future LED locations. Once the surface was covered, access would become much more difficult.
2. Plane the Obvious High Spots
Even after sorting and crowning the joists, there were high spots. I moved a long straightedge across the framing, found locations where it rocked or high-centered, and used a power planer to address them.
This took about 30 minutes. For a project with this much expensive decking going over the top, that seemed like a worthwhile investment.
3. Protect the Framing Tops
Finally, I covered the joists and blocking with butyl joist tape. The idea is to limit water sitting on top of the framing and protect those vulnerable surfaces.
After all the work already buried in that structure, it felt like cheap insurance.
Composite Decking: Start With the Reference, Not Necessarily the House
I chose TimberTech Landmark decking in American Walnut. It was a substantial upgrade from the inexpensive material I had removed.
I bought it online during a sale and felt pretty good about the deal until the delivery arrived. Shipping did not include a flatbed and forklift unload. My employees helped me hand-unload several thousand pounds of decking from the truck.
Before ordering decking online, confirm exactly how it will be unloaded. Preferably before the truck is four hours late and you have a tee time approaching.
For product-specific requirements, including spacing and approved fastening methods, use the manufacturer’s decking installation resources alongside the project plans.
Why I Started in the Middle
The first row established the direction of everything that followed. I started near the middle at my planned reference line rather than against the house.
That line had already controlled the front-edge framing. Starting there meant the visible front could end on a full board, while partial boards and adjustments for walls that were not perfectly parallel could be tucked against the house.
I triple-checked the line, installed the first row with Cortex screws and matching plugs, and built outward from it.
The Fastening System Made Repetition Easier
For most of the field decking, I used CAMO Wedge Clip hidden fasteners. Their built-in spacing allowed me to position several boards before fastening them.
The workflow was straightforward:
- Place a few boards and clips.
- Use deck-board straightening tools to pull the boards into alignment.
- Drive the clip screws with the stand-up fastening attachment.
- Repeat until my back appreciated the tool purchase.
I bought that system myself and had no affiliation with CAMO. It simply worked well for this project, particularly the drill extension that let me locate and drive screws without constantly bending over.
I did run a little short on decking. Fortunately, my wife made a lumberyard run that kept the work moving.
Breaker Boards and Picture Framing Made the Biggest Visual Difference
The most nerve-racking cuts came after much of the decking was installed.
I had left the board ends long so I could trim them together with a track saw for the picture-frame border and perpendicular breaker boards. A bad cut here could have meant thousands of dollars in damaged material and a whole lot of rework.
I measured repeatedly, verified the layout, and cut slowly.
Breaker boards divide the decking into intentional sections instead of leaving scattered butt joints throughout the surface. That cleaner layout was one of my original goals, and it made a huge difference.
The perimeter picture framing took more time than almost anything else in the decking stage. There was a lot of measuring, fitting, and chasing small adjustments, but it gave the finished deck a much more deliberate, higher-end appearance.
Before installing the border boards, I routed grooves in their undersides for the future LED strips. That detail also carried onto the stair overhangs.
Finishing the Stair Treads
I installed the corner fascia and trimmed the risers first, then assembled the picture-framed stair treads.
Each tread needed to accommodate a full inner board and a framed outer board with the intended overhang. For the mitered returns, I tried a technique using pocket screws and CA glue to hold the corners together.
That was an experiment in keeping the joints aligned over time, not proof of long-term performance or a substitute for the decking manufacturer’s guidance.
Happily, the finished tread layout worked. After all that math, having full boards land where they were supposed to land was extremely satisfying.
Black Cable Railing Kept the Backyard Feeling Open
For the railing, I chose a Muzata stainless steel system with black cables. I liked its substantial construction and the way the dark cable visually disappeared into the background.
The blocking I had installed earlier gave the posts solid mounting locations. After positioning and shimming the posts plumb, I measured and cut the 304 stainless steel top rails.
Stainless tubing is not particularly interested in being cut quickly, so I took my time.
The kit included the drill and tap for the rail-mounting holes. Once those holes were prepared, I secured the rails from underneath with flathead screws.
The cable installation was less intimidating than I expected. One end received the anchor, the cable threaded through the posts with the small covers added along the way, and the opposite end connected to the tensioner.
From there, it was repetition. The clean look was exactly what I wanted: a railing that defined the edge without visually closing off the backyard.
The Details I Still Needed to Finish
The deck surface was complete, but a project this size still had a punch list.
- A couple of railing sections were waiting on the correct part or completion of adjacent column trim.
- Some fascia remained open while I worked out permanent under-deck access.
- One corner needed replacement fascia because I had cut the original pieces incorrectly.
- The covered area still needed trim, paint, a new ceiling, and other finishing details.
- The perimeter and stair LED strips still needed installation, along with accessible power supplies.
There was also one layout mistake that would probably bother nobody except me: a breaker board did not line up exactly with the adjoining picture-frame border.
I had planned blocking for the borders and breaker boards, but missed how the overhang affected that particular intersection. The support location limited where the board could land.
Anyone coming over for a cookout would almost certainly never notice. I, of course, will see it forever.
Still, having my daughter’s friends over for an early cookout gave me a glimpse of the whole point of this project. The deck was becoming a place to spend time together, not just a collection of measurements I could criticize.
DIY Deck Cost Breakdown: $23,400 Versus $65,000
Here is where the money went, using the rounded project figures I tracked:
- Concrete pier installation: $3,000.
- Professional header replacement: $2,000.
- Delivered framing lumber: $2,900.
- Composite decking and delivery: $12,500.
- Initial hardware, hangers, and electrical materials: $1,000.
- Black cable railing: $1,500.
- Additional fasteners and miscellaneous items: $500.
That brought the comparison total to $23,400, or 36% of the $65,000 quote. The difference was $41,600, a savings of 64%.
I also spent $1,700 on outdoor LED strips and power supplies. Because lighting was not included in the contractor’s quote, I left it out of the direct comparison. Including that purchase, my spending reached $25,100.
These are my project costs, not a price-per-square-foot estimate or a promise of what another deck should cost. They also do not assign a dollar value to my labor.
Was Building the Deck Myself Worth It?
Financially, I came very close to my goal of saving two-thirds of the quoted price.
Physically, this was a certified butt ton of work.
I spent easily three weeks working hard on the build, mostly alone, learning unfamiliar details as I went. That active work came after the earlier foundation installation, seasonal delay, and all the planning around the broader backyard renovation.
A helper would have made plenty of it faster. Experience would have made the decisions faster. Neither changes the fact that a composite deck like this contains a tremendous amount of labor.
I started by wondering how much a contractor could possibly be making on a $65,000 quote. By the end, I understood the price a lot better.
The real DIY question is how you value your time, effort, and willingness to learn. For me, saving $41,600, learning a ton, and having the satisfaction of building this space made it worthwhile.
Just do not confuse saving money with getting something for free. I paid for a large portion of this deck by going to bed exhausted every night. And I would still hire those framers again in a heartbeat.
Project Sponsor: Backup Power That Also Helped on the Job
Jackery sponsored this project, and I used its Home Power 3600 Pro Max both as backup power for selected outdoor circuits and as a portable power station during construction.
The backup setup served our pool-equipment subpanel and other outdoor loads through a manual transfer switch, with the battery kept inside the shop in a cool, dry location.
The important distinction is that the Jackery unit handles the automatic changeover internally when configured for that function. A conventional manual transfer switch does not become automatic by itself.
The system supports 120-volt and 240-volt loads, with actual operation dependent on its configuration, ratings, and connected demand. Transfer equipment is essential to isolate the alternate source and prevent dangerous backfeeding onto utility lines. Panel work and transfer-switch installation should be handled by a qualified electrician under applicable requirements.
I tested the setup by cutting utility power and confirming that the pool equipment kept running. During the project, three additional outages occurred without interrupting my work on the backed-up circuits.
Unplugged from backup duty, the unit also charged tool batteries and powered my air compressor wherever I needed it. Having a shop nearby does not always mean having a convenient outlet exactly where the work happens.
The promoted setup offered changeover in roughly a tenth of a second and potential installation savings compared with a separate automatic-transfer arrangement. Those cost and installation-time comparisons depend on the specific installation, but the practical benefit for me was simple: less interruption and portable power when I needed it.


