There is a point in a shed build when you really want it to stop looking like a housewrap advertisement and start looking like an actual building. That is where I am with the Camphouse Shed.
Unfortunately, the weather has other plans. Every promising stretch of the forecast seems to turn into rain, ice, or another cold, miserable day. So the strategy is simple: work on trim and siding when the roof is off limits, then take advantage of the dry days to get the remaining metal panels in place.
This round includes PVC fascia, trim around all nine windows, the roll-up door surround, two types of siding, cedar soffits, and a roof installation that has been keeping me up at night. Shed greatness apparently comes with a lot of ladder climbing.
Key Takeaways
- Fitting fascia in place and transferring overlap marks helped produce tight seams and flush edges.
- Adjustable siding gauges made supporting and spacing long lap siding boards much easier while working alone.
- All roof panels were positioned, but ridge caps, edge trim, and fastening work still remained.
- Siding and trim added $2,202, bringing the shed's running project cost to $14,015.
Table of Contents
- Fitting the Fascia Without Guessing Every Angle
- PVC Window and Door Trim: Expensive Taste Meets Cedar Shims
- The PVC Fastener System I Wish I Had Found Earlier
- Choosing Two Different Shed Siding Materials
- Installing HardiePlank Lap Siding by Myself
- Stopping for Cedar Soffits Before Closing the Wall
- Getting the Remaining Metal Roof Panels in Place
- Preparing the Siding for Paint
- The Siding and Trim Budget
- Waterproof Ish, with a Real Finish Line in Sight
- A Note from the Sponsor: Keeping Track of the Money
Fitting the Fascia Without Guessing Every Angle
Before installing the final roof panels, I needed fascia around the eaves, the porch sides, and the back roof face. Working alone, I found it much easier to fit these pieces in place than to calculate every finished length and intersection on the ground.
My process was to:
- Temporarily attach the fascia boards with their ends left long.
- Cut the known peak angle first.
- Hold the adjoining porch fascia in position and mark where the boards overlap.
- Remove the pieces, trim to the marks, and test the fit.
- Make small adjustments until the edges meet cleanly.
A scrap of the same PVC trim made a handy reference for marking the back side of adjoining pieces. That let me transfer the actual intersection rather than trust a measurement that might be just close enough to annoy me forever.
Cedar shims were the other big help. During final assembly, I slipped them behind the fascia wherever necessary to bring the faces flush. Between shims and careful trimming, the seams ended up tighter than I think I could have managed with measurements alone.
Then I pre-painted the fascia before installing the drip edge and flashing. Is that an extra step at this stage? Absolutely. Am I still doing it? Also absolutely. A second coat will come after the rest of the exterior work.
PVC Window and Door Trim: Expensive Taste Meets Cedar Shims
Starting with the porch wall flashing
Along the bottom of the porch wall, I wanted some protection between the OSB sheathing and water on the slab. I installed Z-flashing behind the lower edge of the wall covering, with the idea of directing water away and leaving a small drainage space.
This was one of those details I worked through as I went, not a carefully engineered flashing specification. For a similar build, the important thing is to check the siding manufacturer's base flashing and clearance requirements rather than assume my improvised detail applies everywhere. The drainage path needs to stay open.
Keeping the trim flat
I chose PVC trim for the windows and doors because apparently the theme of this shed is go big or go home. That theme also applies to the material bill.
The entry door needed shims behind the trim near the jamb to keep it in plane with the wall. That was a little gift from my earlier door installation. Around the windows, the inner edges of the trim were resting on the screw heads that secure the windows, so I used more cedar shims to support the outer edges and keep the boards from tilting.
These windows were intended for surface mounting, which helps explain why this was not a perfectly straightforward trim installation.
One small improvement made a noticeable difference: score each shim before snapping off the excess. It breaks much more cleanly and leaves a neater edge for the siding to meet later.
Adding drip caps above the windows
Each window received metal cap flashing above its top trim board. Even the windows under the covered porch got it. Those were a useful practice run before moving to the less accessible windows.
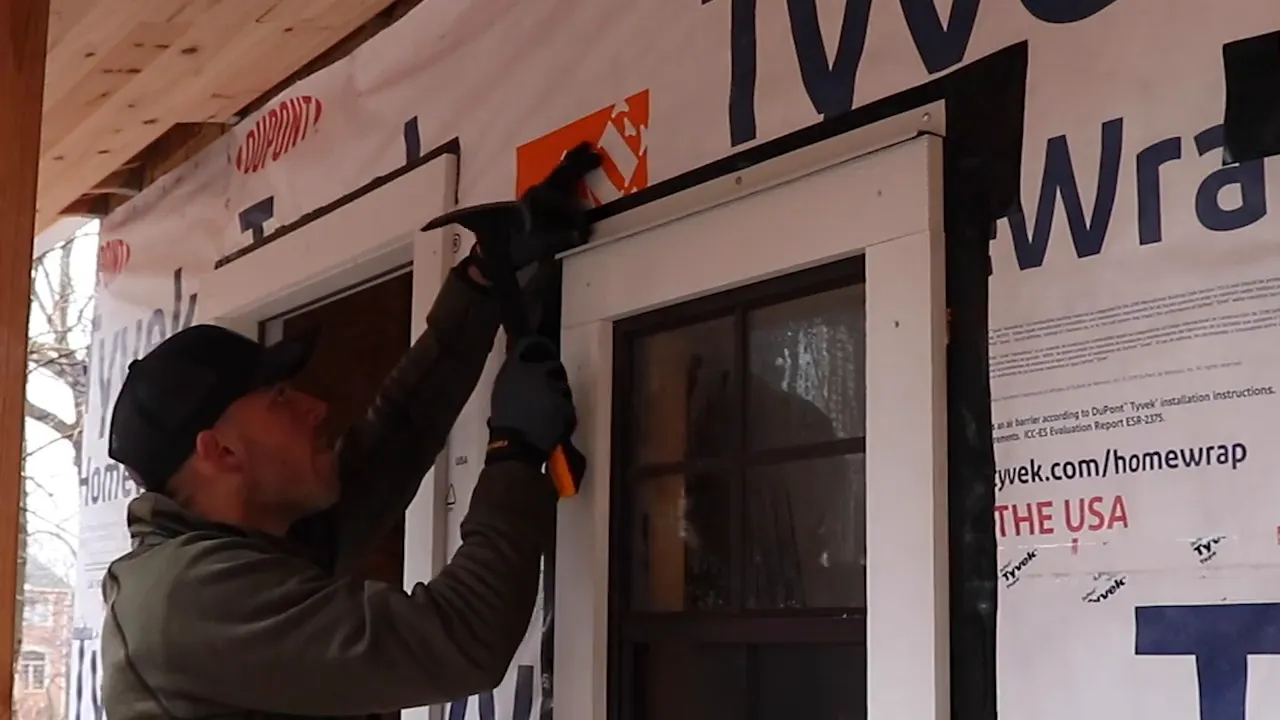
One detail I would improve is leaving the flashing ends slightly long and bending them down over the corners. I cut these closer to the trim width, but wrapping the ends was something I recognized afterward.
Then it was more of the same around the rest of the shed, including the tiny gable windows that require an extension ladder. You might think that after six windows I would have developed a wonderfully efficient system. The number of trips up and down the ladder suggests otherwise.
The last two dormer windows brought another reminder: mud on boots and metal roofing are a terrible combination. Even the relatively shallow porch roof became alarmingly slippery.
The PVC Fastener System I Wish I Had Found Earlier
For the roll-up door surround, I used my house's garage door as a visual reference. Thin PVC covered the inside edges of the opening, flexible sealing strips went along both sides, and wider face trim finished the outside. The top received the same general drip-cap treatment as the windows.
About this time, after installing the window trim with ordinary PVC screws, I discovered a screw-and-plug system. Excellent timing, as usual.
The driver has a depth-setting feature that recesses the screw consistently. A matching plug then covers the hole, leaving a much cleaner-looking face than an exposed fastener hole that needs filling.
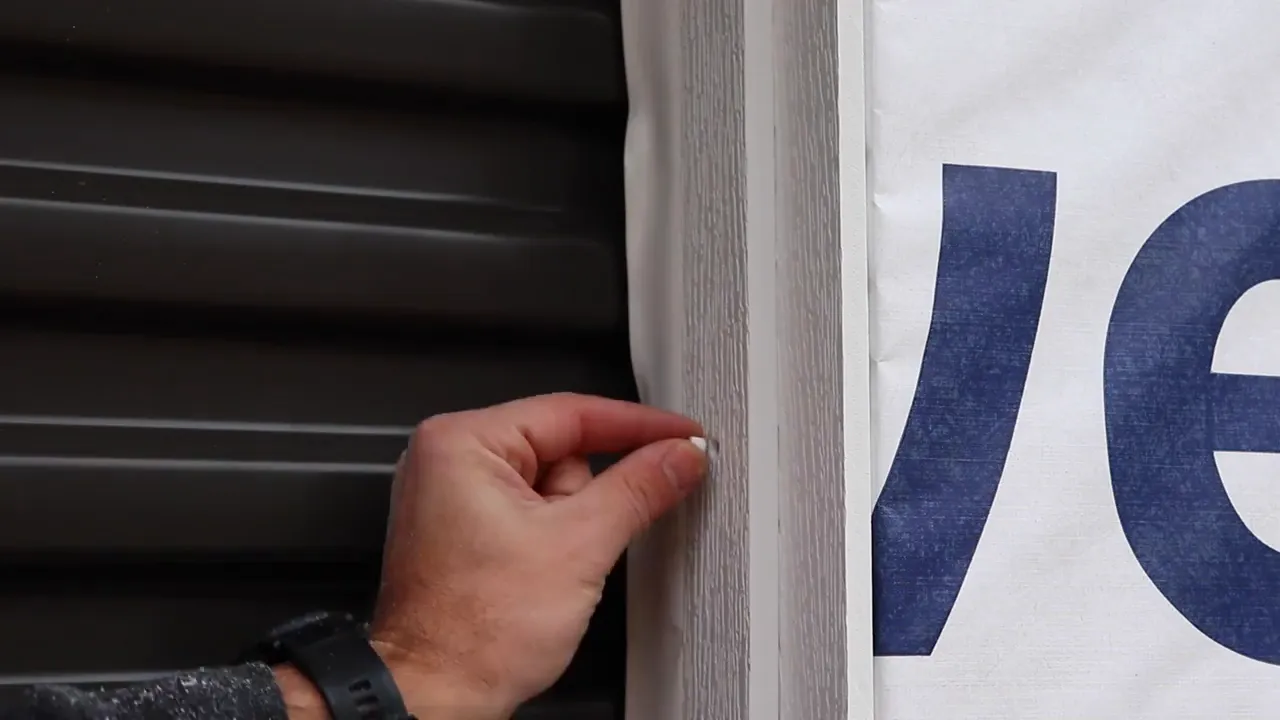
If I were starting the PVC trim again, I would have this system ready from the beginning. Instead, I used it for the remaining roll-up door trim and corner boards, while the earlier screw holes became another finishing task.
With the corners wrapped, the final trim pieces went along the sides of the dormer roof. I pre-painted those too, ready for the roof-edge flashing that would follow.
Choosing Two Different Shed Siding Materials
I wanted the front of the shed to have a little more character than plain lap siding, without paying for that treatment on every wall.
- Front wall and dormer: LP SmartSide engineered-wood cedar shake-style panels.
- Remaining walls: HardiePlank fiber-cement lap siding, which cost less and echoed the siding on our house.
The shake panels have a textured face and an uneven lower edge that creates the appearance of individual shingles. My panels already had a gray finish or coating, but I planned to paint over them regardless. Factory appearance is not a substitute for checking the product's finishing requirements.
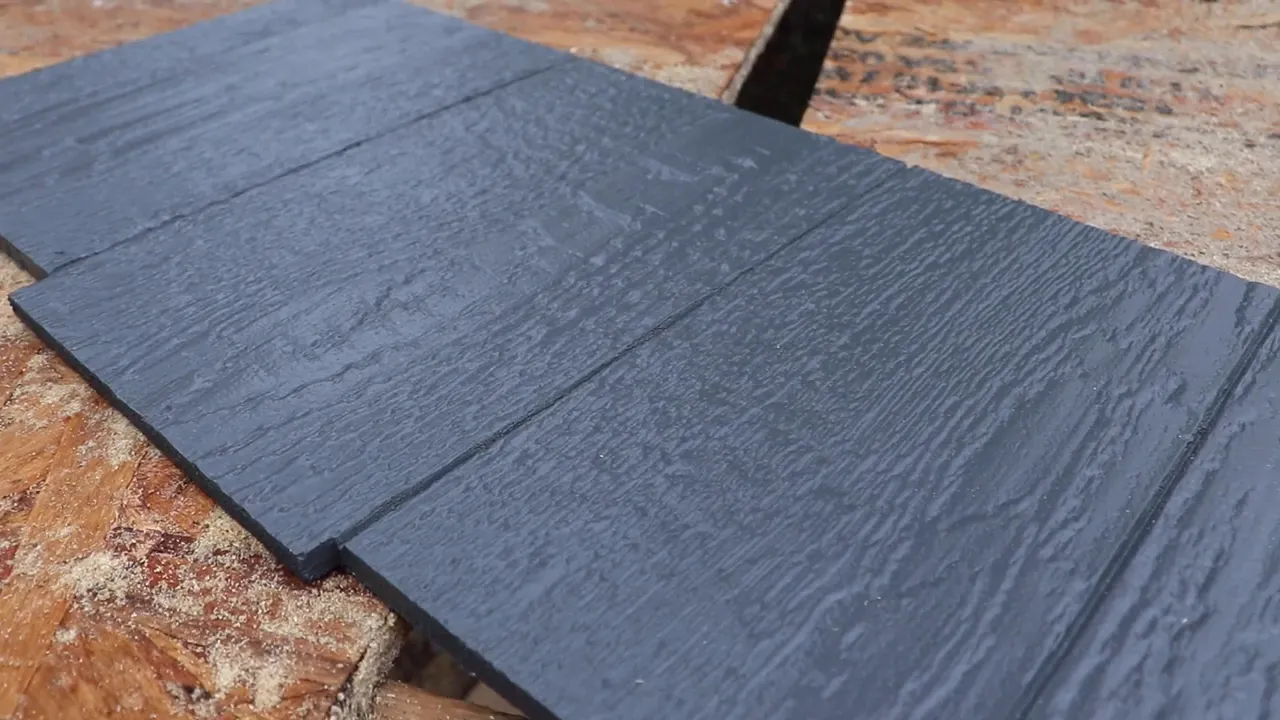
Installing the shake-style siding
I began the front wall with a level reference line from my green laser level. That line established the top of the first siding course.
Next, I ripped starter strips to 1 1/2 inches wide. These kick the bottom of the first course outward so it sits at the same angle as the overlapping courses above it. I used 1/8-inch material as a spacer above the base flashing during this installation.
To create a straight bottom edge, I trimmed the irregular shingle ends off the first-course panels. Only the bottom course needed that treatment. The subsequent courses kept their staggered lower edges.
For the particular panels and fastening approach I used, the installation recommendations allowed attachment to the sheathing rather than requiring every fastener to hit a stud. I spaced the stainless exterior screws about 12 inches apart. Those details are product-specific, so they are not a universal fastening schedule for engineered-wood siding.
I did not have a siding nailer, and my framing nailer would not accept the short nails I needed. Screws were slower, but they let me keep moving without buying another tool.
Once the bottom row was installed, I made a simple layout template to mark the next course for a 9-inch reveal. The key visual detail was staggering the starting positions of the panels so the joints did not stack vertically. The goal is a wall that looks like individual shakes, not a grid of obvious panel seams.
The engineered wood was easy to cut around the windows. At the top of the wall, I ripped narrow finishing pieces from the bottoms of additional panels and attached them with galvanized finish nails. That upper termination still needed some thought, possibly an additional trim piece to close the remaining gap.
Installing HardiePlank Lap Siding by Myself
The first lesson with fiber-cement siding arrived before installation: carry the boards on edge. Long planks flex dramatically when held flat, and they can snap much more easily than you might expect.
After marking the wall's stud locations, I cut starter strips with a dedicated fiber-cement circular saw blade. A regular wood-cutting blade is not the right tool for this job.
Cutting also produces a lot of dust. This deserves more than an offhand reminder to put on a mask. Use the manufacturer's recommended cutting methods and dust controls, with appropriate respiratory protection. OSHA's crystalline silica guidance provides useful context for why fiber-cement cutting dust needs to be taken seriously, even outdoors.
Get the first course level, not parallel to an imperfect slab
The first course establishes everything above it. I took extra care to get it level, which also made the unevenness of my slab very obvious. Another opportunity to admire my foundation work.
From there, a pair of PacTool Gecko Gauge siding clamps made solo installation dramatically easier. These clamp onto the installed course and create small shelves for the next plank. The reveal is adjustable, and the clamps hold the board while you position and fasten it.
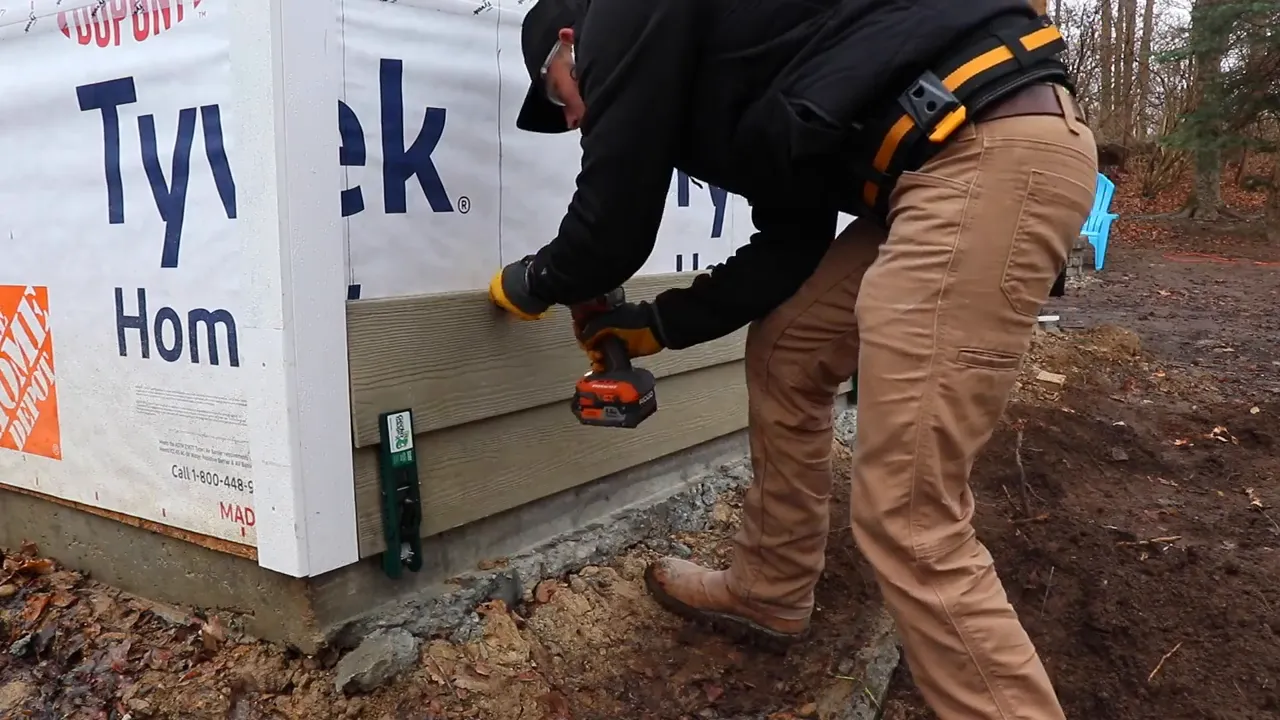
The working rhythm became pretty simple:
- Clamp the gauges onto the installed course.
- Set the next board on their support shelves.
- Position it with the required clearance at the trim.
- Fasten at the marked stud locations.
- Release the gauges and move them up.
I used screws made specifically for Hardie board siding. As with the shake panels, fastening details and joint clearances need to match the exact product and wall assembly.
I also checked the courses periodically with a level. The gauges make spacing consistent, but checking as you go is still much easier than discovering a problem at the top of the wall.
Stopping for Cedar Soffits Before Closing the Wall
As the siding approached the small roof overhang on the gable end, I stopped to finish the underside. That work was easier to handle before the siding boxed everything in.
First came 2x4 blocking for the decorative cedar roof supports I planned to add later. Those supports needed solid mounting points aligned with the wall framing, not just something that looked convincing from the outside.
Then I installed the cedar soffit boards under the small roof and continued closing in the larger overhangs. For the gable overhangs, I cut a batch of 12-inch cedar pieces.
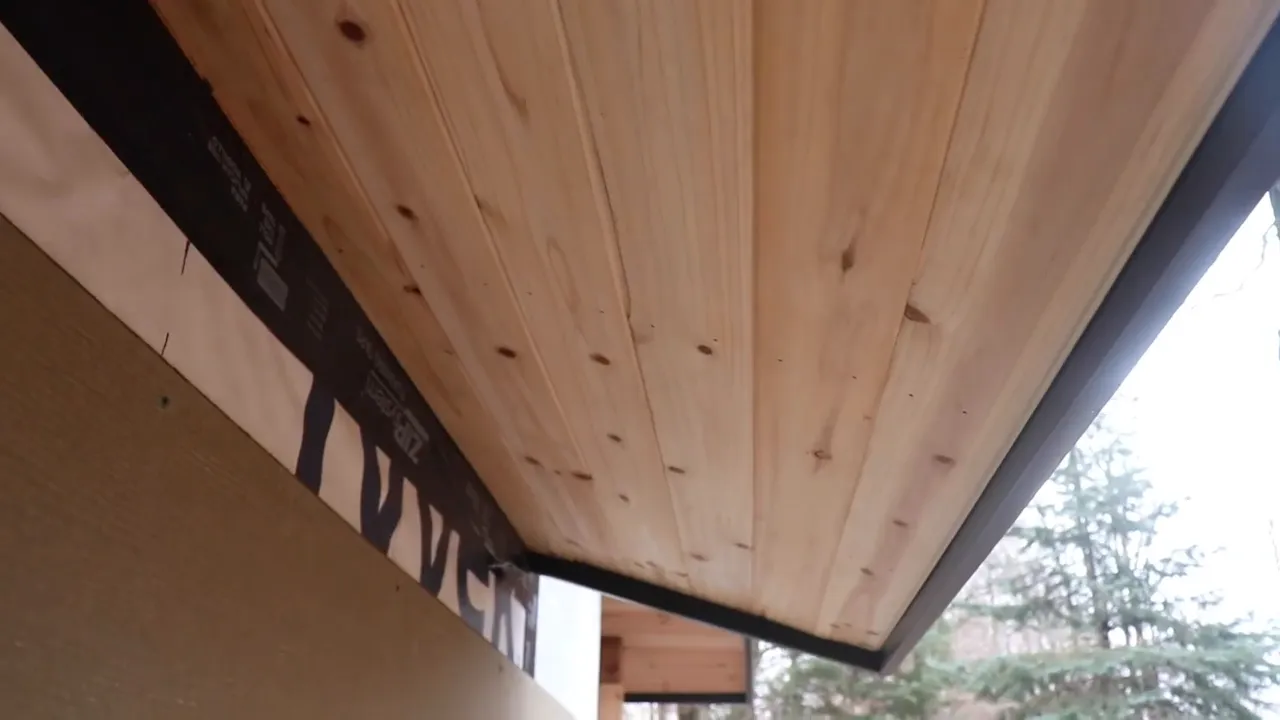
There was still an awkward transition where the porch and main roof met. That became a detail to resolve later rather than a reason to stop all progress.
With the soffit installed, I could finish the lap siding on that end. This included wrestling a long, narrow piece into the gauges, finally getting it supported, and discovering I had it backward.
Taking it down, turning it around, and trying again without breaking it was a very productive trip on the Struggle Bus. Check the orientation before lifting the floppy, fragile board into place. Ideally before celebrating.
Getting the Remaining Metal Roof Panels in Place
A dry day at 36 degrees finally opened a window for roof work. Not exactly luxury building weather, but I was not going to waste it.
The biggest challenge was access. The porch roof is roughly a 15-degree slope, while the main roof is about 40 degrees. If muddy boots could barely stay put on the porch, different shoes were not going to magically solve the main roof.
I experimented with upholstery foam for traction, then built a simple 2x4 ladder that hooked over the opposite side of the roof. Drawer liner on the back helped protect the metal and reduced movement.
That was my improvised access method, not a substitute for a properly designed roof-access and fall-protection system. A homemade ladder and extra grip do not eliminate fall hazards. This part of the project was uncomfortable for good reason, and it is a place where proper equipment and another person's help matter.
The panel installation sequence
I started with the small dormer roof, using the same basic metal roofing sequence as before:
- Position a panel and install one screw near the top, leaving room for adjustment.
- Apply butyl tape at the overlapping panel joint.
- Position the adjoining panel.
- Install the profile-matching foam closure along the lower edge.
- Apply the silicone sealant used for this roofing assembly beneath the panel at the closure.
- Secure the panels with the roofing screws.
The exact closures, sealants, and screw pattern belong to the roofing system's installation instructions, not a one-size-fits-all recipe.
Moving panels onto the back roof face
For the back roof, I brought the panels up the front and moved them over the ridge. That felt more manageable than trying to push them uphill from the back, especially after my earlier adventures handling roof sheathing.
The first panel needed careful alignment because every subsequent panel would reference it. I positioned it with an upper screw, checked the lower edge, and added a lower screw to lock in its position.
On later panels, the butyl tape happened to have enough tack to help hold the overlap while I moved between access points. That was something I encountered during the job, not something to rely on as panel restraint. Large metal sheets need secure handling.
There was a tremendous amount of climbing down, moving around the shed, and climbing back up. But getting the rear panels into position was a huge milestone. This was the job I had been lying awake thinking about, and having the panels sitting where they belonged was an enormous relief.
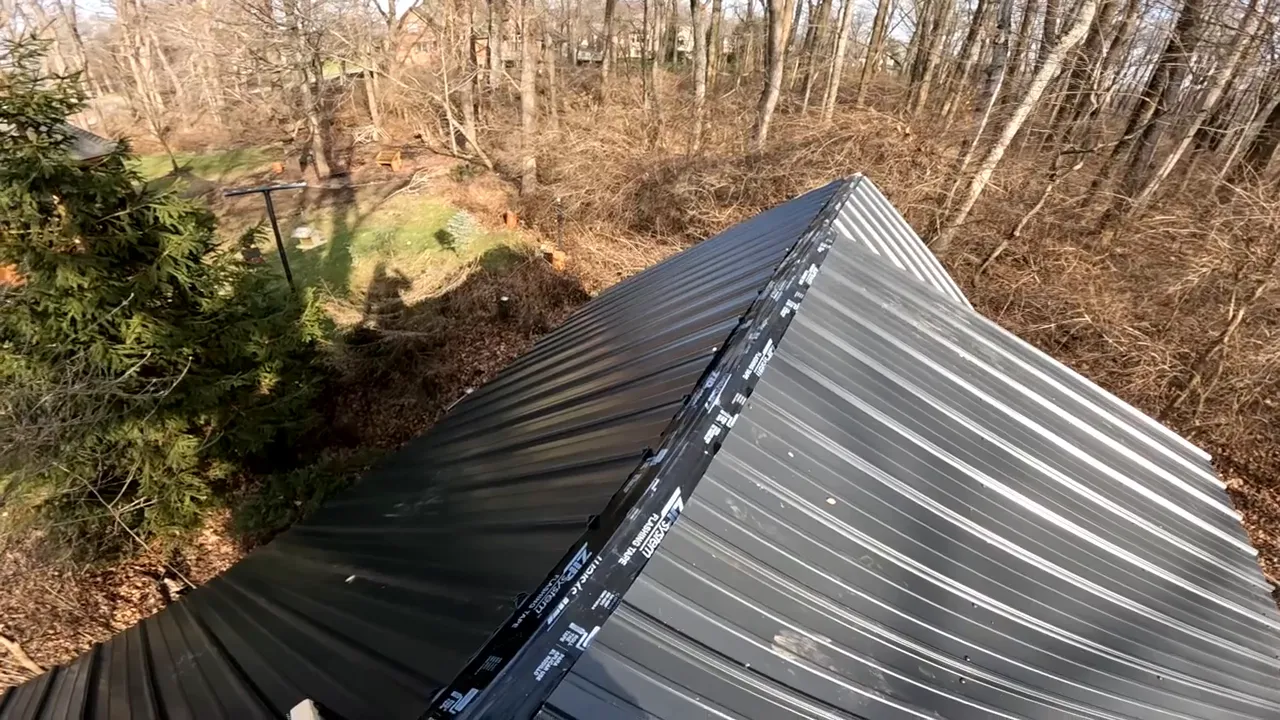
At that point, the remaining roof work included the full field of fasteners, lower foam closures and screws, the ridge cap, and the gable-edge trim. Panels in place is a major step. It is not the same as a finished, watertight roof.
Preparing the Siding for Paint
Back on the ground, I started priming the exposed cut edges of the engineered-wood shake siding. I used dark gray spray primer because the finished exterior will be dark.
Doing that before installation might have made some edges easier to reach, but I chose to handle it afterward. Either way, exposed engineered-wood edges are a finishing detail that should not disappear from the to-do list.
I did not use the same spray-priming step on the fiber-cement siding. Its edge-treatment requirements are different, so follow the instructions for the specific factory finish and field cuts rather than treating it like engineered wood.
Then came caulking at the appropriate siding-to-trim joints. Caulk is very good at making my measuring skills look better, but it is not a replacement for flashing or a reason to seal intentional drainage gaps. The product's joint details still decide what gets sealed and what stays open.
The Siding and Trim Budget
This is where all that expensive taste becomes a very specific number.
- Siding: $1,221. The LP shake-style siding was about three times as expensive as the HardiePlank lap siding used on this build.
- Trim and soffit materials: $758. This category included the PVC trim and about $115 in cedar soffit material.
- Fasteners: $118.
- Miscellaneous supplies: $105. This included flashing, caulk, and primer.
The siding and trim portion totaled $2,202, bringing the running shed project total to $14,015. Roofing materials had already been purchased and counted in an earlier stage, so they were not added again here.
Waterproof Ish, with a Real Finish Line in Sight
The front wall now has its shake-style siding, one gable end has its lap siding, the trim is installed, and all the roof panels are finally in position. The shed looks much more like the building I had in mind.
There is still siding to install on the back wall and opposite end, along with finishing the dormer, roof caps, roof-edge trim, and remaining exterior details. Paint is next on the horizon: gray siding, dark gray trim, and brown and cedar accents.
So, waterproof? Not completely. Waterproof ish is still the honest description. But getting the difficult roof panels into place and establishing a repeatable siding process makes the remaining work feel a whole lot more manageable.
Even if shed greatness continues to involve cold fingers and an unreasonable number of ladder trips.
A Note from the Sponsor: Keeping Track of the Money
Rocket Money sponsored this stage of the build. I have kept a monthly personal-finance spreadsheet for seven years, tracking income, spending, and net worth, so having connected accounts and a consolidated financial dashboard appealed directly to my inner nerd.
I use the app to see my financial picture in one place. It also offers customizable budgets, subscription-management features, and a bill-negotiation service that identified my Verizon and AT&T bills as potential opportunities. There is a free option, with additional features available through Premium.


