From the earliest planning stages of this shop, I wanted to incorporate smart features that would make it easier to work in and leave room for future upgrades. Lights, cameras, sensors, automated dust collection, the whole deal.
What I did not plan on was destroying enough fiber optic cable to turn getting internet into a minor financial crisis.
But we got there. And once the infrastructure was working, the useful stuff started coming together. This is what I installed, what I still have planned, and which smart workshop ideas might actually make sense in your space. You do not have to be a networking expert. I have very thoroughly established that.
Table of Contents
- Key Takeaways
- Getting Internet to a Detached Workshop: My Expensive Fiber Lesson
- Building the Shop's Brain in a Closet
- Security and Awareness: Cameras Cannot Tell You Everything
- Smart Switches, Hidden Relays, and Power Monitoring
- Dust Collection Automation: Make the Useful Thing Easy
- Creature Comforts Count Too
- Smart Organization: Make Storage Totes Searchable
- A Clean, Dedicated Charging Spot
- The Goal Is a Better Shop, Not More Automation
- Sponsor: Narwal Flow 2 Home Cleaning Automation
Key Takeaways
- Build accessible network infrastructure before adding cameras, sensors, and workshop automation.
- Test fiber before installation and guide it gently instead of forcing a difficult pull.
- Automated lighting and dust collection remove small obstacles to better everyday shop habits.
- Choose smart upgrades that solve real problems rather than adding automation for its own sake.
Getting Internet to a Detached Workshop: My Expensive Fiber Lesson
My shop is only about 15 feet from my house. Naturally, I assumed getting internet out there would be as simple as running a long Ethernet cable through some conduit.
That plan had a problem: copper Ethernet creates an electrically conductive connection between buildings. Differences in grounding and electrical surges are concerns when connecting separate structures. Fiber carries the signal through glass instead, avoiding a conductive path through the optical fibers.
So fiber sounded like the better option. Unfortunately, knowing that fiber is a good idea and successfully installing it are two very different skill sets.
Three cables, zero internet
I had already installed about 120 feet of 1-inch conduit before the concrete went in. That was probably the smartest decision in this entire adventure.
After an hour of internet research, I spent $250 on a preterminated fiber cable. I built a little spool mount in the basement, got out the fish tape, and started pulling.
I immediately learned two things: my fish tape needed to be longer, and wire-pulling lubricant was going to be my friend.
Everything seemed reasonably successful until the final section into the shop. I crawled underneath the stairs and found myself pulling much harder than I should have. So, obviously, I pulled a little harder.
The cable had snagged on a corner inside a conduit body. My enthusiastic approach ripped the ends off. That was not a repair I was equipped to make.
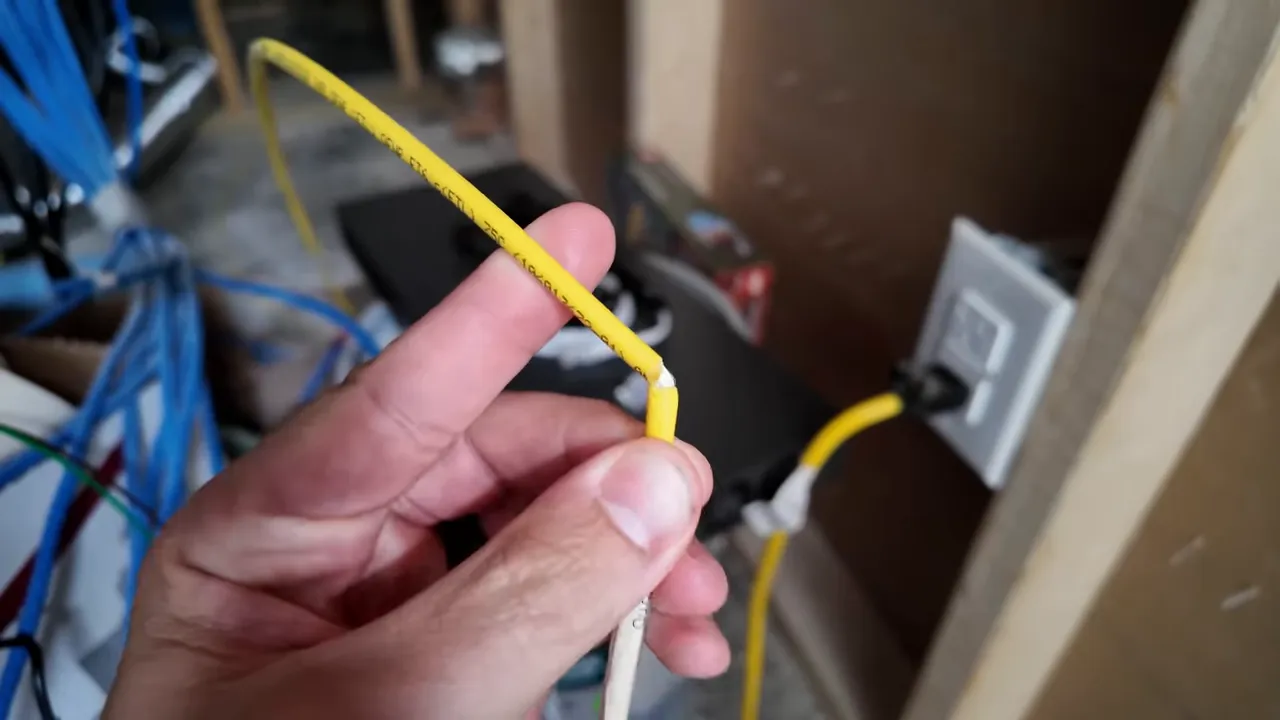
The second $250 cable went through more smoothly, but it did not work either. I found a small break near the end that I suspect was the culprit.
For attempt three, I tried a $76 cable from Amazon. Still nothing. I do not know whether that one arrived bad or whether I damaged it. Testing it before installation would have been an excellent way to answer that question.
What finally worked on attempt four
For my fourth attempt, I bought a $99 armored fiber cable and a separate pulling eye. At that point, I had spent almost $700 on cables alone and was very ready to stop buying them.
This time, I changed the process:
- I tested the cable before pulling it. It worked before it went anywhere near the conduit.
- I used a pulling eye. The attachment felt more secure and helped spread the pulling load.
- I reversed direction. Instead of pulling toward the shop, I pulled back toward the house.
- I opened the troublesome conduit body. That let us guide the cable through the corner rather than drag it blindly around it.
- I recruited help. My wife gently fed the cable while I pulled, with us coordinating over FaceTime.
- We stopped forcing things. Plenty of pulling lubricant, no kinks, and much more patience.
My highly technical new rule: if I am grunting while pulling fiber, something is going horribly wrong. Follow the cable manufacturer's pulling-tension and bend-radius limits, not my original instincts.
The armored fiber cable that finally worked was only part of the solution. Changing how we handled it mattered too.
At the house, a media converter connects the fiber link to Ethernet and the home network. After plugging everything in, I got the green lights I had been desperately hoping for. We finally had Wi-Fi in the shop.
Hallelujah. Now we could start making the place smart.
Building the Shop's Brain in a Closet
The little closet under the stairs is the central connection point for the entire shop. The fiber, Cat 6 network cables, and speaker wires all terminate there.
Originally, it was exposed studs and a tangled disaster. Before adding more electronics, I needed to make it usable without breaking the one fiber cable that had survived me.
I framed and finished the space, added lighting, installed plenty of outlets, and put in shelves for the various doohickeys that would live there. I also left an access opening below the shelves so I could reach the area where the fiber enters.
That last detail matters. Finishing a utility space is great. Permanently burying the connections you might need to service later is less great.
A patch panel, network switch, and Wi-Fi
Next came cable organization. I terminated the shop's Ethernet runs at a wall-mounted patch panel, then used short patch cables to connect them to the network switch. Other nearby devices can plug directly into the switch.
The basic jobs are different:
- The fiber connection links the shop network to the house.
- The patch panel gives the fixed Cat 6 runs a tidy termination point.
- The network switch connects wired devices.
- The Wi-Fi equipment provides wireless access in the shop.
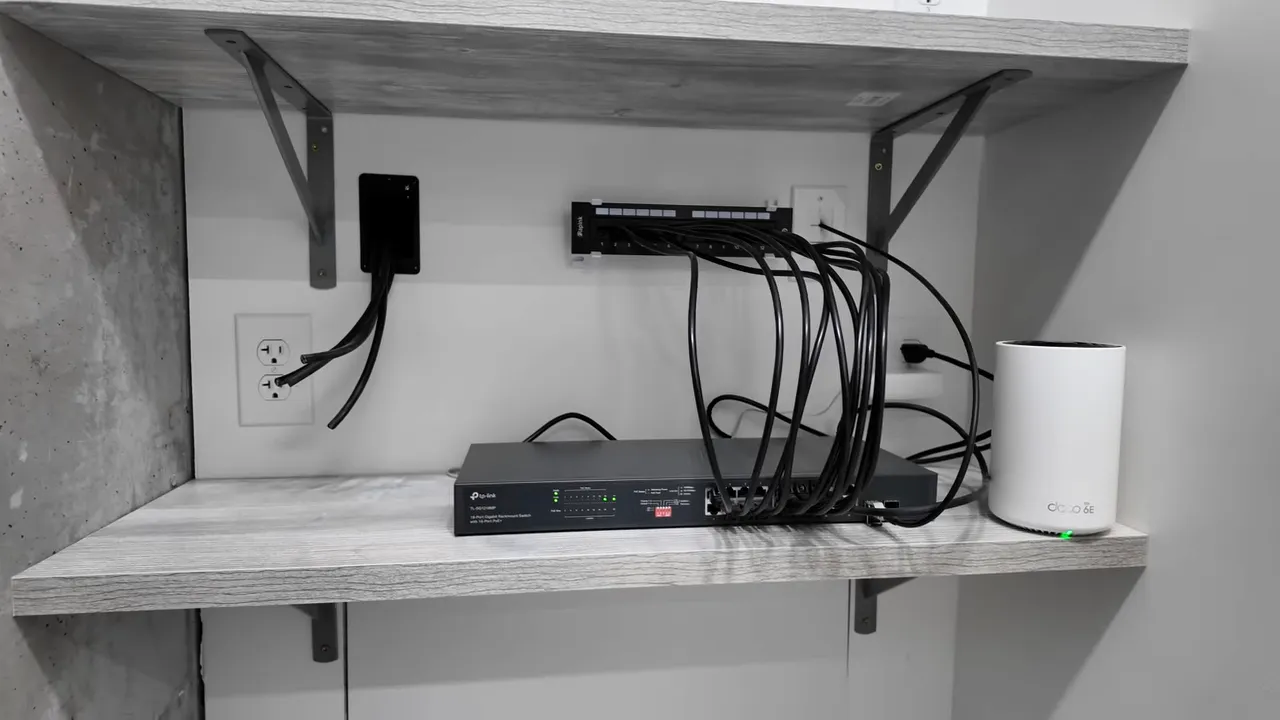
It is not some giant server rack, but it is organized, accessible, and ready to build on. Not too bad for a tech noob.
Why I added a NAS to a workshop
A NAS, or network-attached storage device, is basically a small computer built around shared storage. It is not necessarily the first thing you think of buying for a woodshop, but mine has three specific jobs.
- Store security footage. The cameras around the shop tie back to it.
- Back up critical files. I already have a NAS at home and another at my editor Colby's house in Utah. The shop unit adds another place for important files.
- Make project files available in the shop. That includes 3D printing designs and vector files for the laser.
The home and remote NAS units already help us move large video files back and forth. We use synchronized folders, so footage added at one end appears at the other.
Not every workshop needs this. For my mix of woodworking, 3D printing, laser work, and video production, having a Synology NAS in the shop makes a lot of sense.
The smart hub connects the automation
The other piece is a smart hub. I am using an older Samsung SmartThings hub, although there are plenty of alternatives.
The hub is the command center for compatible smart devices. It connects the sensors and controls so a reading or event can trigger an action. The network gets devices connected; the hub helps turn those devices into a useful system.
Security and Awareness: Cameras Cannot Tell You Everything
I think of this category as security and awareness. Cameras are useful, but they cannot necessarily tell you that water is leaking under a sink or that the air is full of fine dust.
Three camera locations to start
During construction, I ran Cat 6 to the places where I expected to need cameras. With compatible Power over Ethernet equipment, or PoE, a single network cable can carry both data and power to a camera.
I installed Synology cameras in three locations:
- By the entry-side front corner: covering the backyard and pool area.
- At the opposite front corner: facing the driveway and the house garage.
- On the shop ceiling: providing a wide interior view, including the main entry door.
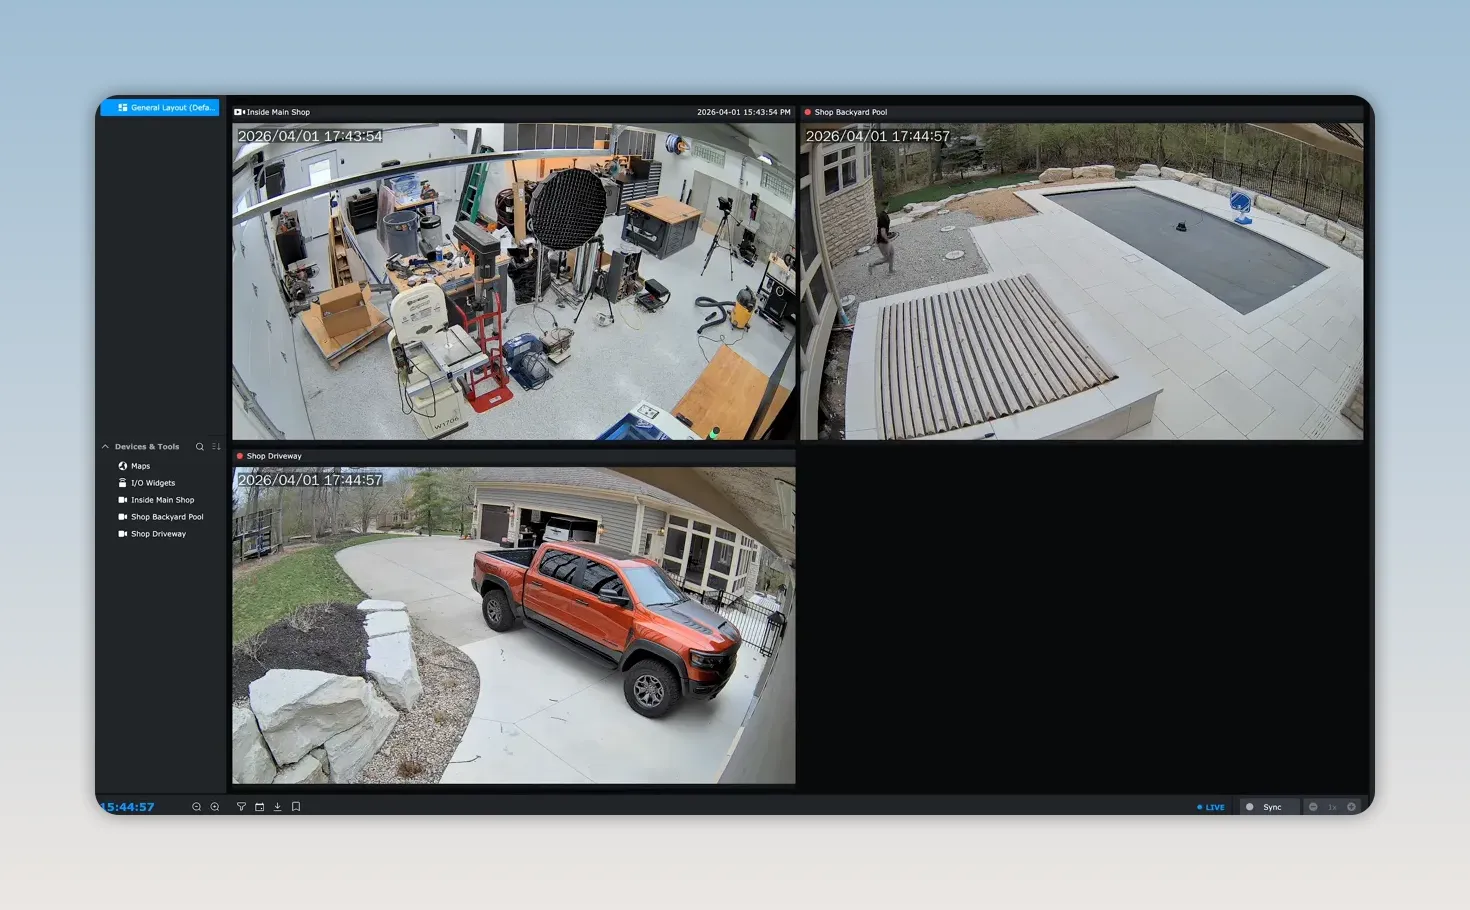
I also plan to add at least one more camera upstairs to cover the 3D printing area. That is a future addition, not something I have finished yet.
Water leak sensors
A water leak sensor connects to the smart hub and sends an alert when it detects water. It is a simple little device with some obvious places to earn its keep:
- Under a sink.
- Near an air-conditioning drip pan.
- Under or beside a water heater.
- Anywhere a leak could go unnoticed.
It does not need to be flashy. Finding out about unwanted water sooner is useful enough.
An air quality monitor for dust and finishing
An air quality monitor gives me real-time readings to keep an eye on while working. In a woodshop, the particulate readings are especially relevant. My monitor displays PM10, PM2.5, and PM1 readings, covering different particle-size categories.
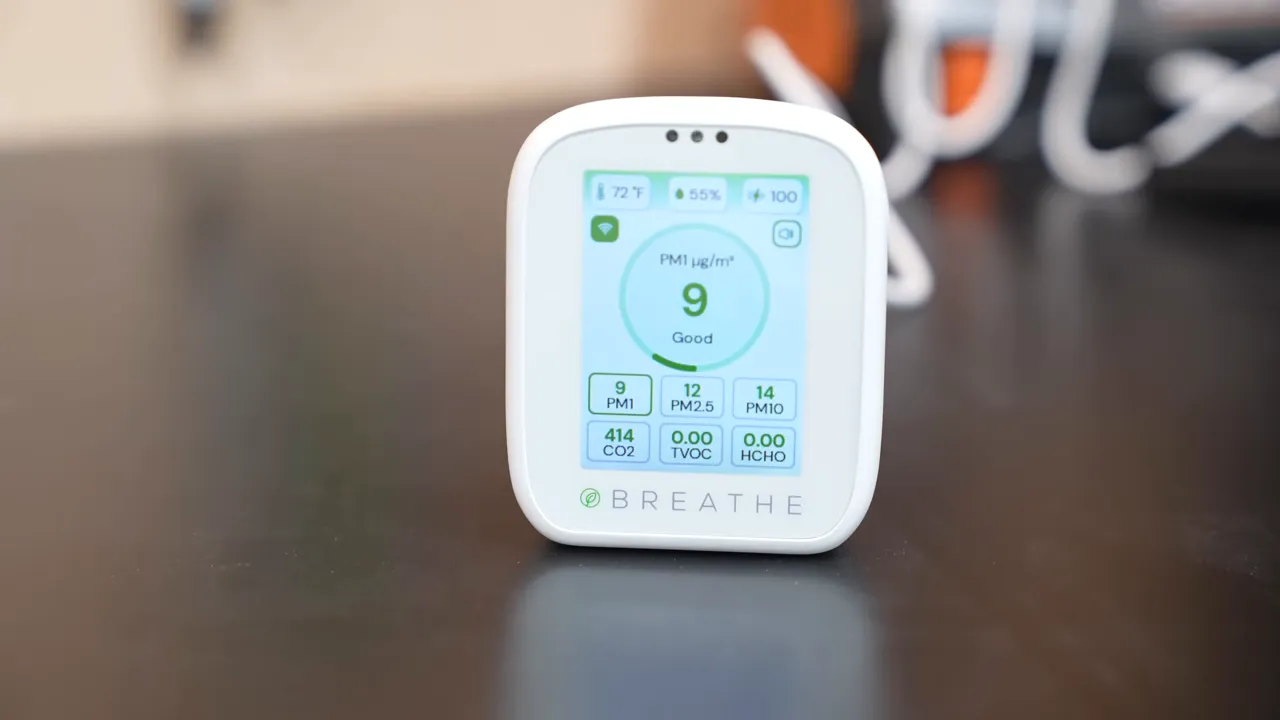
Those readings help flag airborne particles that may need attention. During finishing work, VOC readings are another thing to keep an eye on.
A monitor is feedback, not dust control. It does not replace collection, ventilation, or appropriate protection. For more background on why controlling exposure matters, OSHA's wood dust guidance is a useful reference.
A multisensor turns readings into actions
I also added a multisensor upstairs near the 3D printing area. It can report conditions including motion, light, temperature, humidity, UV, and vibration.
Connected to a compatible hub, readings like those can become automation triggers:
- Motion can turn on a light.
- A low-temperature reading can trigger compatible heating controls.
- High humidity can send an alert or start an appropriate action.
Humidity is particularly interesting to me because of the 3D printing setup. The point is to monitor the conditions that matter for your work, rather than collect a bunch of numbers because an app looks cool.
Smart locks and door-open sensors are other possible additions. I expect this setup to evolve, but the basics already give me more awareness of what is happening when I am not in the shop.
Smart Switches, Hidden Relays, and Power Monitoring
A smart light switch is basically the gateway drug to home automation. Turn a light on from your phone once, and suddenly you are wondering what else you can connect.
But you do not necessarily have to replace the visible switch.
Keep the switch and add a smart relay
A smart relay is a small module that can live behind an existing switch. With the right device and wiring arrangement, it adds smart control while retaining the physical switch.
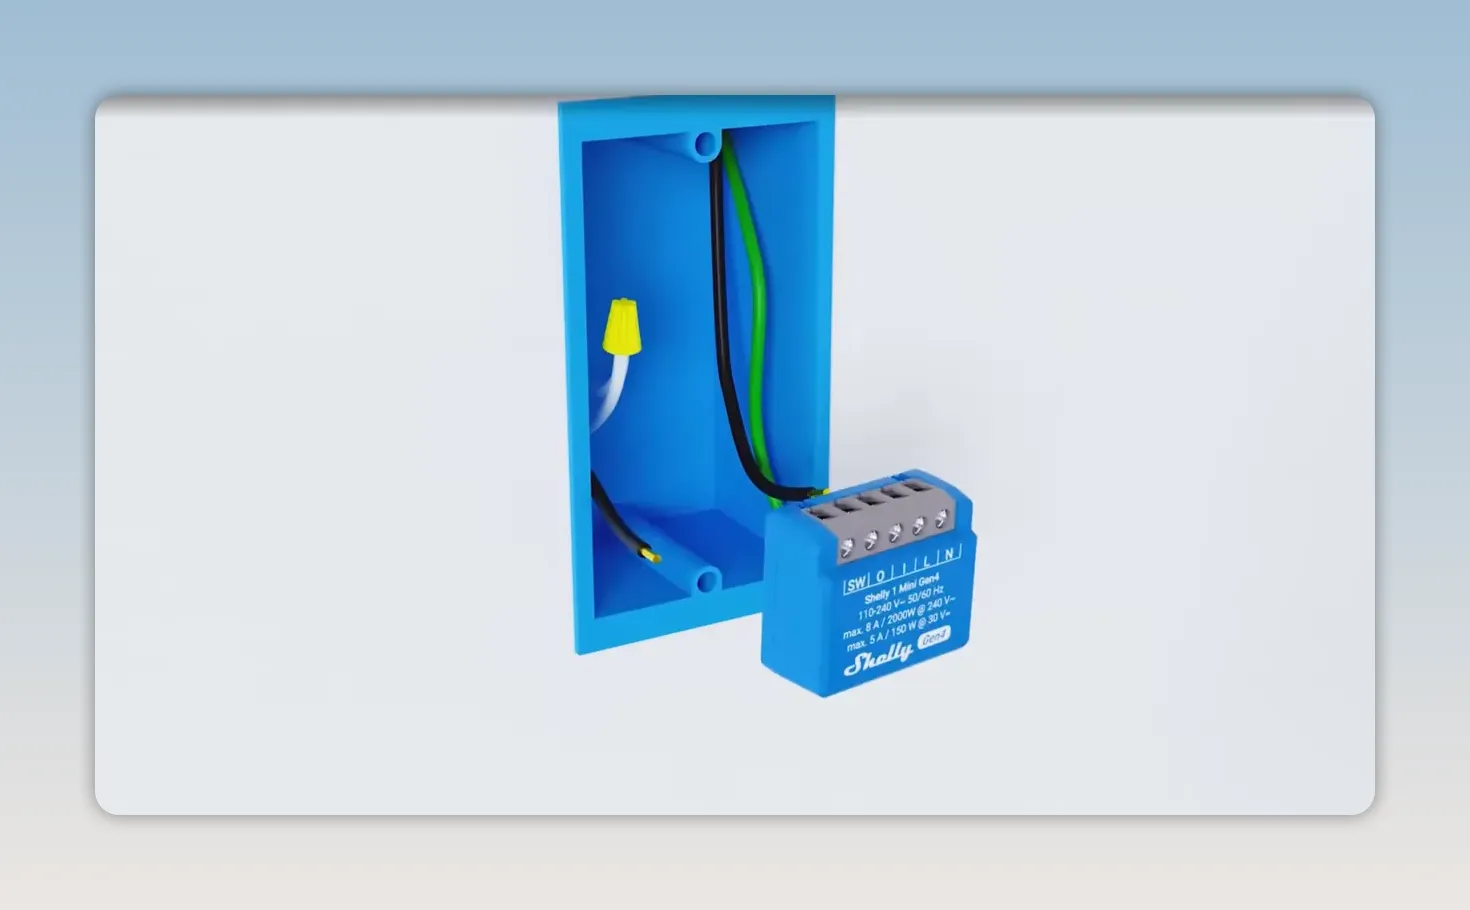
There are different versions for different jobs, including lighting control, 12- or 24-volt LEDs, and power monitoring. Depending on the relay and application, the possibilities extend to fans, garage-door controls, and other equipment.
The important qualifier is the correct device for the load and application. A tiny relay is not automatically suitable for a large motor just because both involve electricity. Follow the manufacturer's ratings and installation requirements, and use a qualified electrician when needed.
I started by adding relays to a few lights in and around the shop. That gives me useful control now and room to experiment later.
Turning lights off is just as useful as turning them on
Walking into a shop and having the lights come on is convenient. Being able to control special filming lights is useful for my work too.
But my favorite practical application may be solving my apparent inability to turn off the upstairs lights.
I connected a smart relay with the multisensor so the upstairs light turns off after a set period without motion. That is a real problem solved, rather than automation looking for an excuse to exist.
Panel-level energy monitoring is on my list
Another option is a smart energy monitor installed in the electrical panel. It can help you understand power use while the shop is working and while everything is sitting idle.
I have not added one yet, but I am interested. Our pool equipment is powered through the shop, and I would like to know how much electricity it uses. I am also curious about the appetite of the big dust collector upstairs.
That would give me something better than guessing how much juice everything is consuming.
Dust Collection Automation: Make the Useful Thing Easy
Dust collection only helps when you use it. And you are more likely to use it when turning it on is easy.
There are several levels of automation here, and you do not need to jump straight to the final boss.
Level 1: A handheld remote
The simplest option is a remote-controlled switch. Plug the vacuum or dust collector into an appropriately rated unit, then use a handheld remote to turn it on and off.
This is what I use inside my workbench. The collector is tucked away, and the remote lives in a drawer where I can grab it for cleanup or a quick router or sander job.
Nothing starts automatically, but I also do not have to crawl into the cabinet to reach a switch. That alone is an improvement.
Level 2: A tool-triggered vacuum switch
An automatic vacuum switch has separate connections for the tool and the vacuum or collector. When it detects the tool drawing power, it starts the vacuum after a short delay.
These are especially handy for a miter saw, sander, or track saw. I have used them in previous miter stations, and some also support a remote for manual operation.
Level 3: An extractor with built-in automatic operation
My Bosch dust extractor under the miter station handles this internally. When I start the miter saw, the extractor starts about a second later. After I finish the cut, it continues running for roughly six seconds.
That run-on time is useful because extraction continues after the saw stops. More importantly, I do not have to remember a separate vacuum switch for every cut.
Level 4: Tool sensors and automated blast gates
For a larger central system, sensors on tools such as the table saw or band saw can trigger the main dust collector.
The next step is automated blast gates that open and close according to which tool is running. Now the system is handling both collector startup and airflow routing.
I am not there yet. It is something I may add later, but the simpler options already remove a lot of friction from using dust collection consistently.
Creature Comforts Count Too
Not every upgrade needs to be completely utilitarian. Making the shop a more enjoyable place to spend time is a perfectly good reason to install something.
Ceiling speakers and phone-controlled audio
I like music and podcasts while I work, but I do not want to wear earbuds all the time. During construction, I ran speaker wire through the ceiling and took pictures of its locations before everything was covered.
Those pictures made finding the wires later much easier. After locating them and cutting the openings, I installed four flush-mounted ceiling speakers.
Do I need four? Unclear. But that is what went in.
I terminated the speaker wires at a wall plate in the closet and connected a Sonos Amp. Now I can control the audio from my phone, and it has made the shop considerably more enjoyable to work in.
A TV that swivels toward the work area
I also mounted a TV on the feature wall with a swiveling mount, so I can angle it toward different areas of the shop.
It is another creature comfort rather than some essential smart-shop component. And that is fine. A workshop can be functional without feeling like you are being punished for spending time there.
Smart Organization: Make Storage Totes Searchable
I am a big fan of giving everything a known home. But no matter how many cabinets and drawers I add, the storage tote always finds a way back into my life.
After this build, I had plenty of leftover parts and supplies I could not quite bring myself to throw away. I installed long shelves upstairs and grouped everything into clear totes: electrical, plumbing, painting, caulk, and other categories.
Clear bins help. They do not magically prevent things from being forgotten.
QR labels connect each bin to an inventory
I added preprinted QR storage labels to the bins. Each label connects to an inventory in an app, where I can document the contents with as much detail as I want, including photographs.
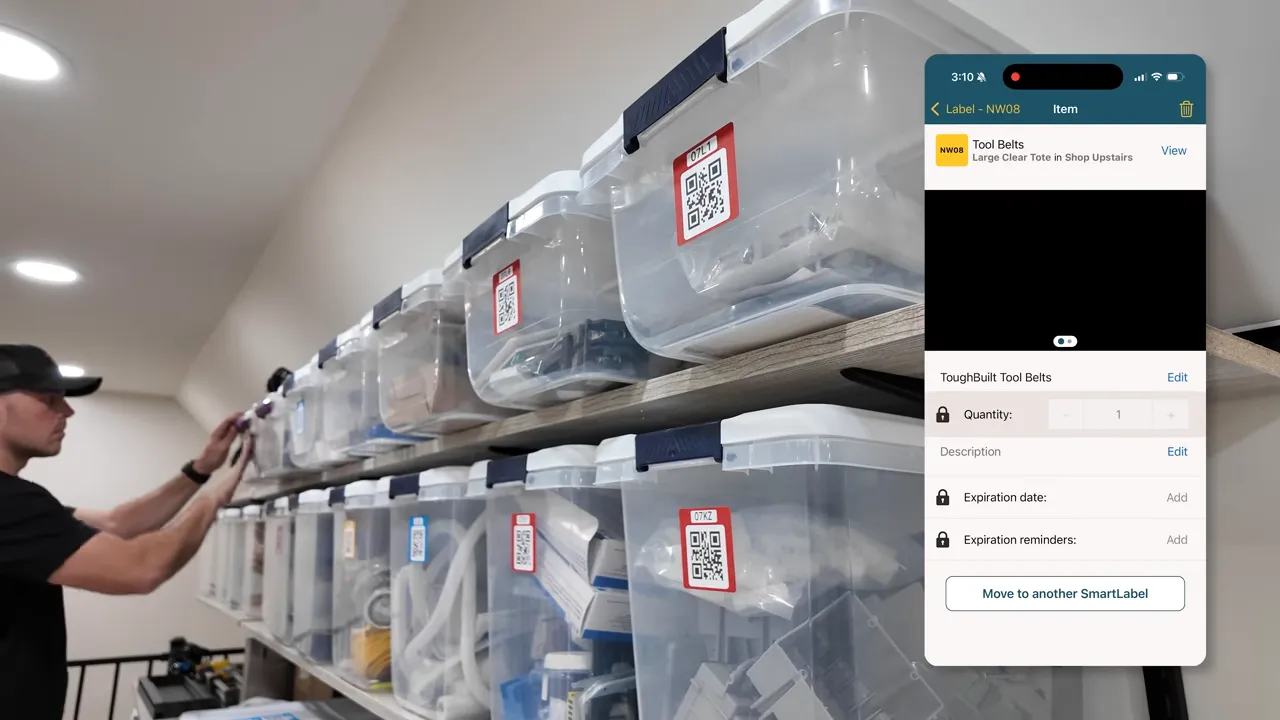
The process is straightforward:
- Group similar supplies in a tote.
- Attach a QR label to the outside.
- Add descriptions and photos of the contents in the app.
- Search the app later to narrow down which bin holds the thing you need.
Instead of opening tote after tote, I can search the free app and go to the right location.
The catch is the initial effort. This system is only as useful as the information I put into it. A label cannot identify the mystery fittings I never bothered to document.
So far, though, I like it. Clear totes or opaque black totes, the benefit is the same: the inventory gives you a way to find things without physically digging through every container.
A Clean, Dedicated Charging Spot
The finished closet gave me one more practical upgrade: a place to store and charge camera equipment.
Previously, cameras, batteries, cables, and other electronics sat out in the shop collecting dust. Now they have a dedicated shelf with plenty of outlets, tucked behind a door.
No elaborate automation required. Just a cleaner place for equipment that really should not have been living beside the sawdust.
The Goal Is a Better Shop, Not More Automation
This setup is going to keep evolving. I still have ideas for another camera, energy monitoring, and more advanced dust collection controls.
But there is a point where you stop solving problems and start automating things purely because you can. I am trying to stay on the practical side of that line.
The worthwhile upgrades make something easier, give me useful information, help me find what I own, or make the shop more enjoyable. That is the standard I want to keep using.
And if you take nothing else from my experience, test the fiber before you pull it. Preferably before you buy the fourth cable.
Sponsor: Narwal Flow 2 Home Cleaning Automation
Narwal sponsored this project, and its Flow 2 robot vacuum and mop is another example of automation taking a recurring chore off the list. This one is for our household floors, separate from the shop's dust collection system.
The Flow 2 uses dual RGB cameras and object recognition to adjust how it approaches obstacles. It can work close to furniture while allowing a larger buffer around pets and other higher-risk obstacles, and it includes quieter behavior around cribs and timid pets.
It also adapts its cleaning approach to dry and wet messes. The FlowWash mopping system uses a rolling track mop, separate clean- and dirty-water systems, heated fresh water, and 12 newtons of downward pressure. It cleans the rolling mop as it works, and the mop assembly extends sideways to reach edges.
For us, that means less babysitting the cleaner and one fewer household job to think about. You can explore the Narwal Flow 2 below.


